Preparing a File for Adding/Updating Records
This article provides instructions on how to prepare a file suitable for adding or updating records via file import.
- If you have already prepared a file for import, refer to the information in this article and check that your file is suitable for file import.
- If you have not yet prepared a file for import, it is recommended that you first export record data from an app to a file and use the exported file as a base for editing data. Referencing the information this article provides, finish up editing data in the exported file.
Exporting Data to a File
File format
The following file formats (file extensions) are supported for file import.
- Excel format (xlsx), CSV format (csv), TXT format (txt), TSV format (tsv)
Files in Excel format (xlsx) can be created with Microsoft Excel (hereinafter called "Excel").
If an Excel file contains multiple worksheets, data on the first worksheet is imported. Data in hidden cells and merged cells is also imported. Unhide or unmerge these cells and check beforehand that the content of the file is correctly specified.
A file in CSV format (csv),TXT format (txt), or TSV format (tsv) can be created with spreadsheet software (e.g. Excel and Open Office Calc), text editors, and so on.
The upper limit on the file size and total number of rows or columns
- Excel format (xlsx)
Up to 1 MB, 1,000 rows
- CSV format (csv), TXT format (txt), TSV format (tsv)
Up to 100 MB, 100,000 rows
Irrespective of the file format, only the first 1,000 columns in the file can be mapped to the fields in the destination app.
If the size of your file for import or the total number of rows/columns in the file exceeds the limit, split the file into smaller files or change the file format (if the file is in Excel format).
For the upper limit on the total number of records or fields that can be added in an app, refer to List of Limits.
How to format data of each record
In your file for import, specify data of each record in the format suited for file import.
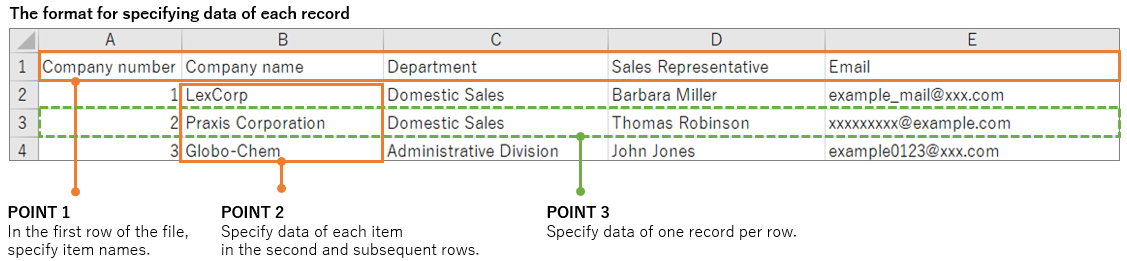
There are three points for formatting data of each record in a file for import.
- Point 1: In the first row of the file, specify item names.
If you use field names in the destination app for item names in the file, file columns are automatically mapped to the corresponding fields in the app when you import the file.
- Point 2: Specify data of each item in the second and subsequent rows.
Specify data of each item in the format supported by the corresponding field. For details on how to format data for each field type, refer to Supported Data Formats for Each Field Type.
- Point 3: Specify data of one record per row.
However, if records contain tables, use one or multiple rows to specify data of each record depending on the number of table rows. For details on how to format data of records that contain tables, refer to Preparing a File for Adding/Updating Records with Tables.
How to format data for each field type
In your file for import, specify data of each field in the format suited for file import.
For details on the formatting for each field type, refer to Supported Formats for Adding/Updating Records.
Also, depending on the field type, there may be limitations on values or the number of characters that can be entered.
For details, refer to Field Entry Limits.
If you import a file that contains empty values, either empty values or default values (if default values are set for the fields) are imported into the corresponding fields in the destination file.
Reference: Basic operations to create and edit a file in Excel
This section explains the basic steps to create and edit a file in Excel, from opening a file in Excel to saving it.
Note that the menu option names and operations may vary depending on your Excel version.
Creating a file from scratch
- Open Excel and specify record data on the first worksheet.
- Select the File tab and click Save As.
- Specify the save location and file name.
- In the Save as type list, select Excel Workbook or CSV (Comma delimited).
- Click Save.
Editing an exported file
You can export record data to a CSV file and use the exported file as a base for editing data.
Reference: Exporting Data to a File
-
Navigate to the "View" screen.
-
Check that the records you want to export to a file are displayed on the screen.
If the records are not displayed or if you want to narrow down the records, change filter conditions. -
Click the Options icon at the upper right of the "View" screen, then click Export to File.
-
Specify the fields whose data you want to export, and then click Export.
-
Download the exported CSV file.
-
Open the downloaded CSV file in Excel and edit the file.
If you want to add new records, add rows in the file and specify data in them.
-
Select the File tab and click Save.