Supported formats for adding/updating records
This article describes how to format data in an Excel or CSV file to import for bulk adding or updating records in an app.
For your reference, this article also provides a sample file that shows the appropriate formatting for each field type. To check the appropriate formatting for each field type, refer to the following section and download the sample file.
Sample file with appropriate formatting for each field type
Formatting for field names
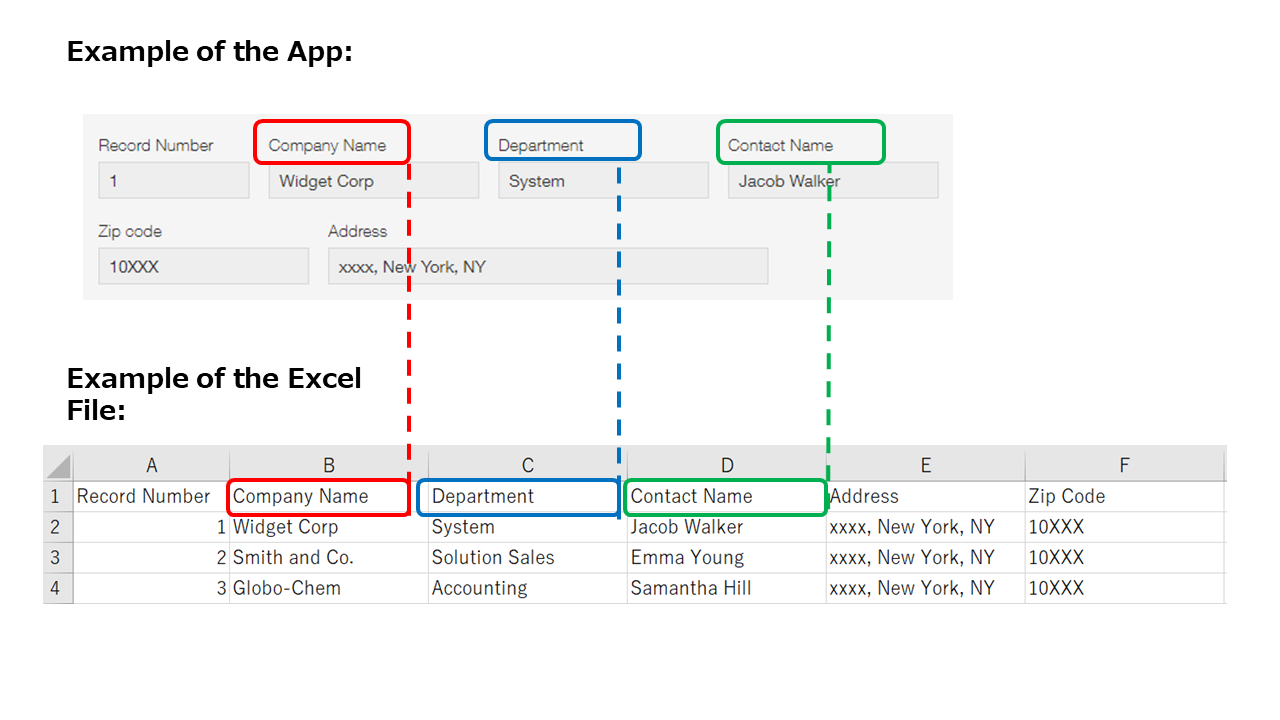
It is recommended that you use field names for the column names (the first row) in your file for import. The file can be imported even if you do not specify field names in it; however, in that case, you will be required to manually map the correspondence between columns in the file and fields in the app when you import the file. Specifying field names in the first row of your file is beneficial since, by doing so, Kintone will automatically map the correspondence between columns and fields.
While it is possible to manually enter field names in the first row of a file yourself, it is recommended that you use the "Export to file" menu option on the app's "View" screen to export the app data to a file. Doing this will export the app's field names to a file, regardless of whether there are any records registered in the app. This is easier than directly entering field names in your file, and you can also prevent input errors. For this reason, it is recommended that you first export app data to a file and use the exported file as a base for editing data.
Exporting data to a file
Formatting for record data
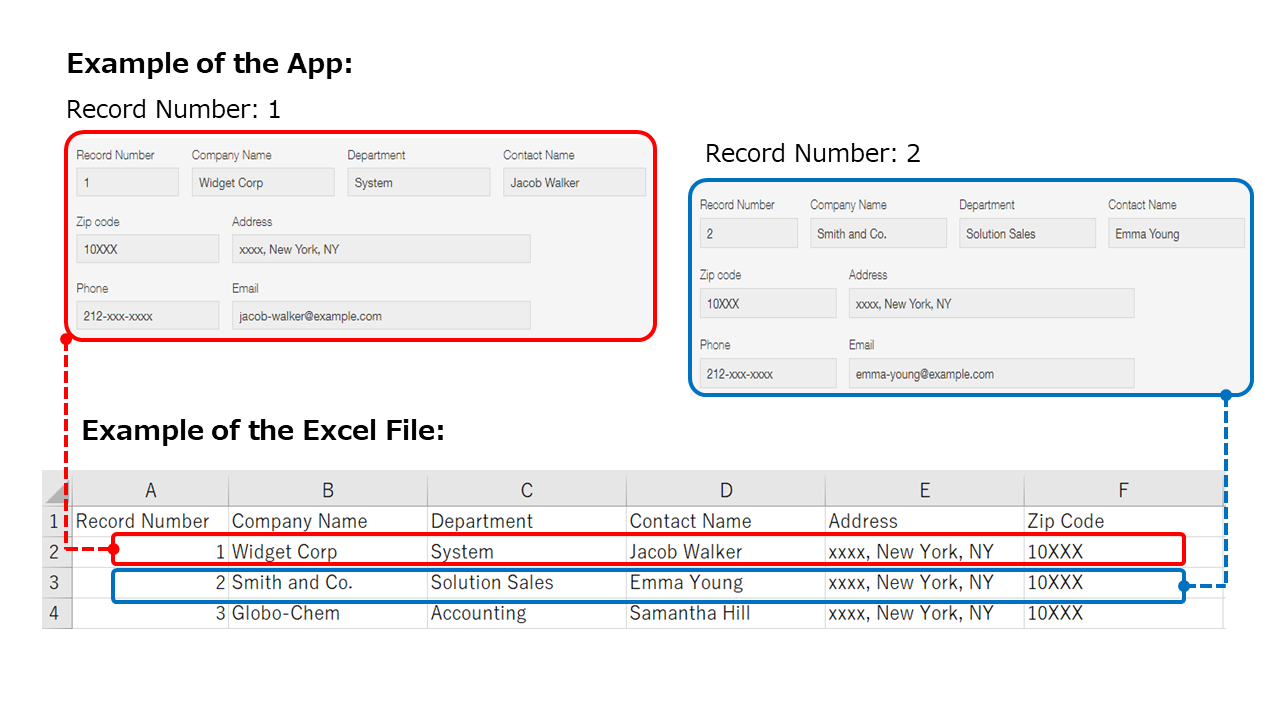
In your file for import, each record should be stored in a single row.
However, if records contain a table, use as many rows as there are in the table to enter data of each record. For details, refer to the following page.
Preparing a file for adding/updating records with tables
Formatting for each field type
Each field type has specific formatting requirements that must be met in order for data in a file to be imported into fields in an app. Referencing the information provided below, specify data in your file in accordance with the format required by each field type.
Text / Text area
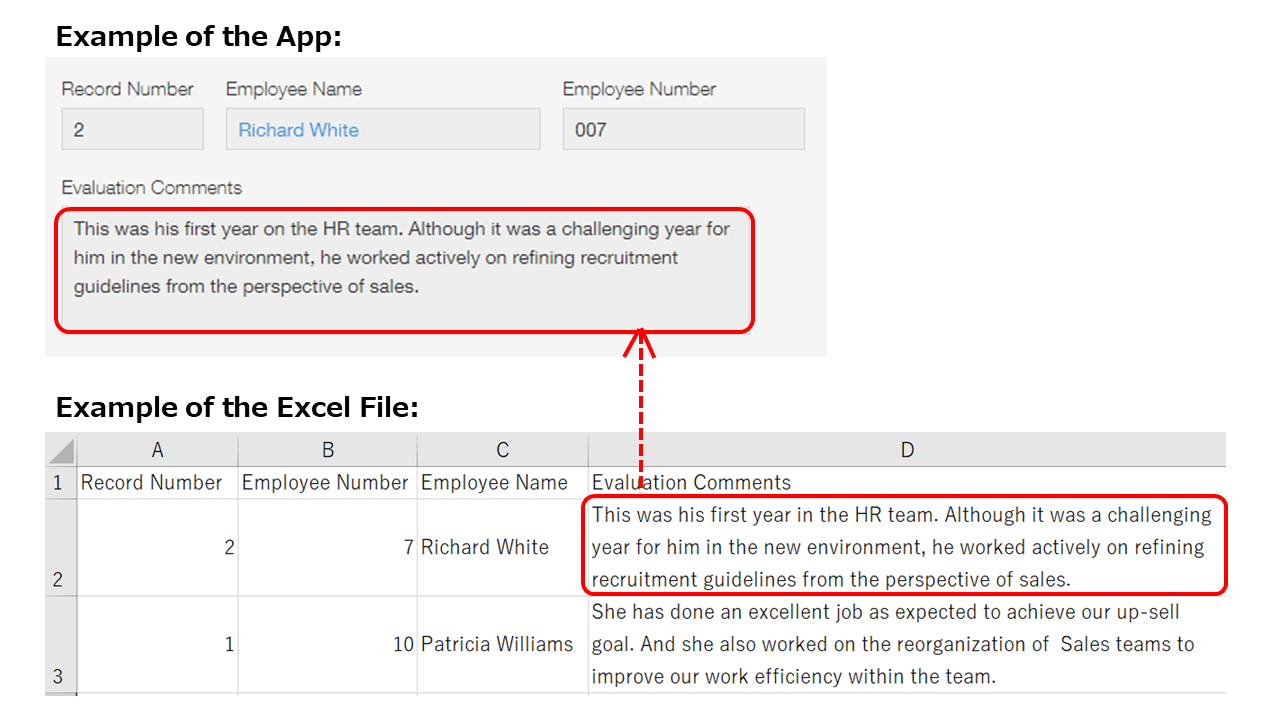
- Enter the text you want to import into the field.
- If you want to import multiline text into a Text area field, enter multiple lines of text in your file using line breaks.
Number
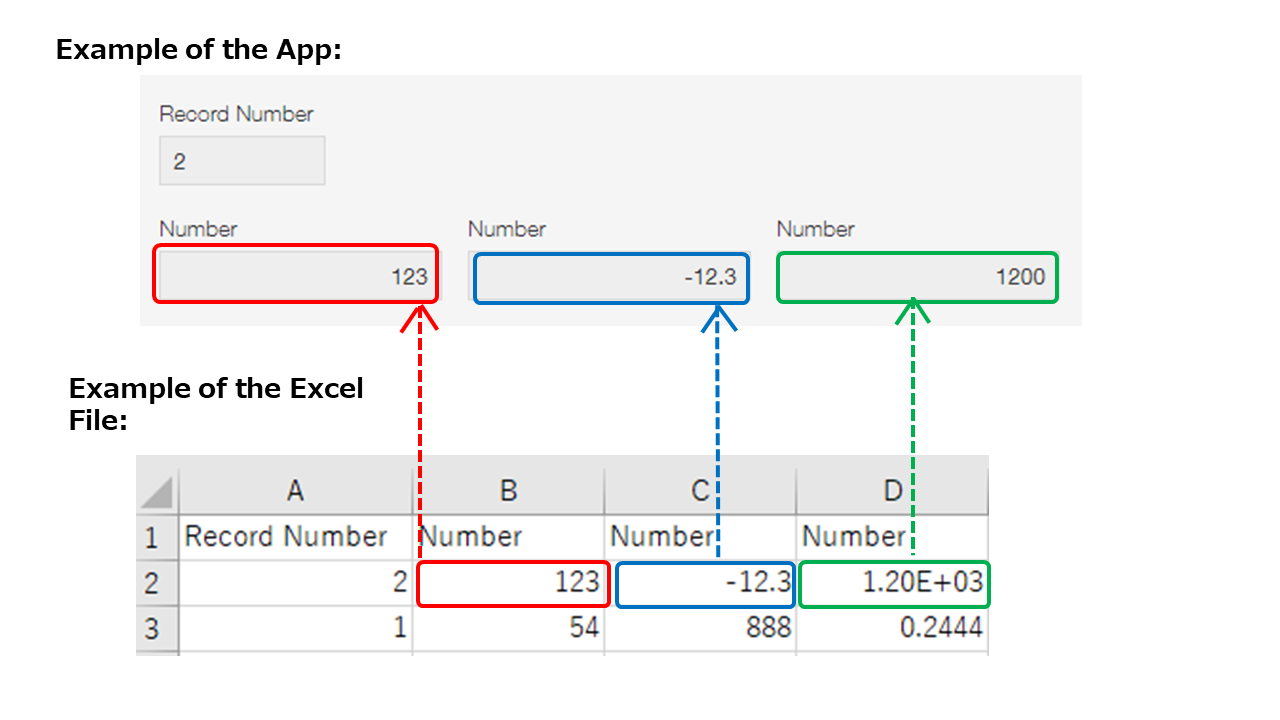
Enter numerical values in any of the following formats:
- Integer
- Decimal
- Negative number
Example: "-1.23" - Exponential number
Example: "1.20E+03" in the file is registered as "1200" in the app.
Rich text

Enter data for the field in HTML format.
Check box / Multi-choice
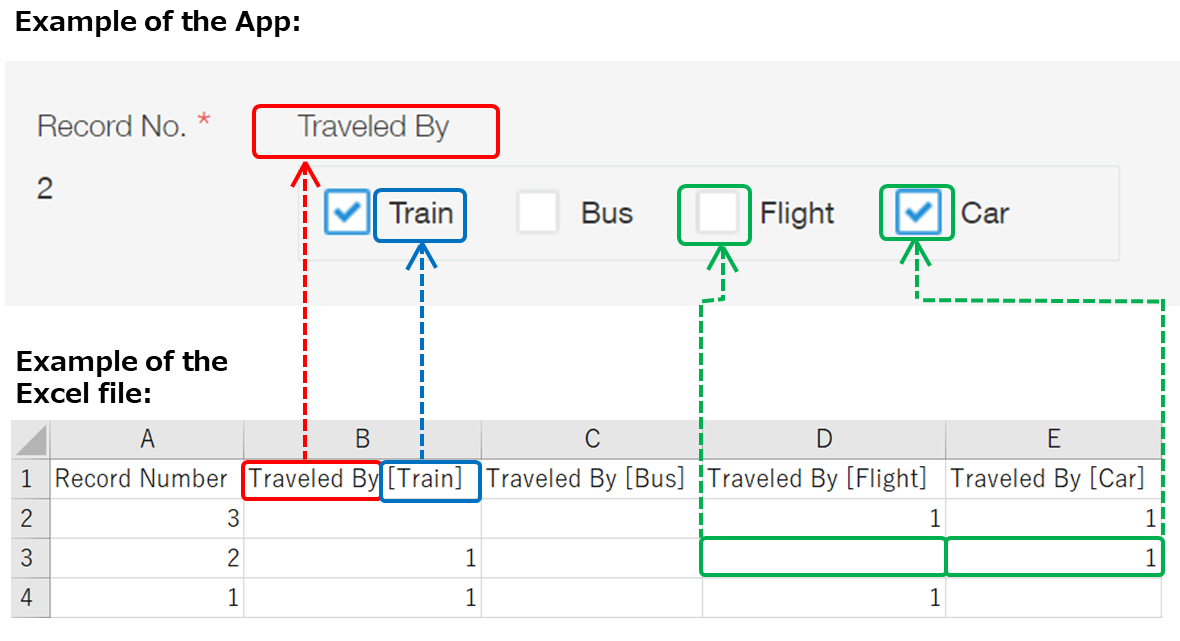
- Use separate columns for each option and enter "Field name [Option name]" in the first row of each column.
Example: If the app has a "Traveled By" field with the options "Train" and "Bus", "Traveled By [Train]" and "Traveled By [Bus]" should be entered in the first row of the corresponding columns. - Enter "1" in the cell for the option to be selected. The cell for the option that is not to be selected should be left empty.
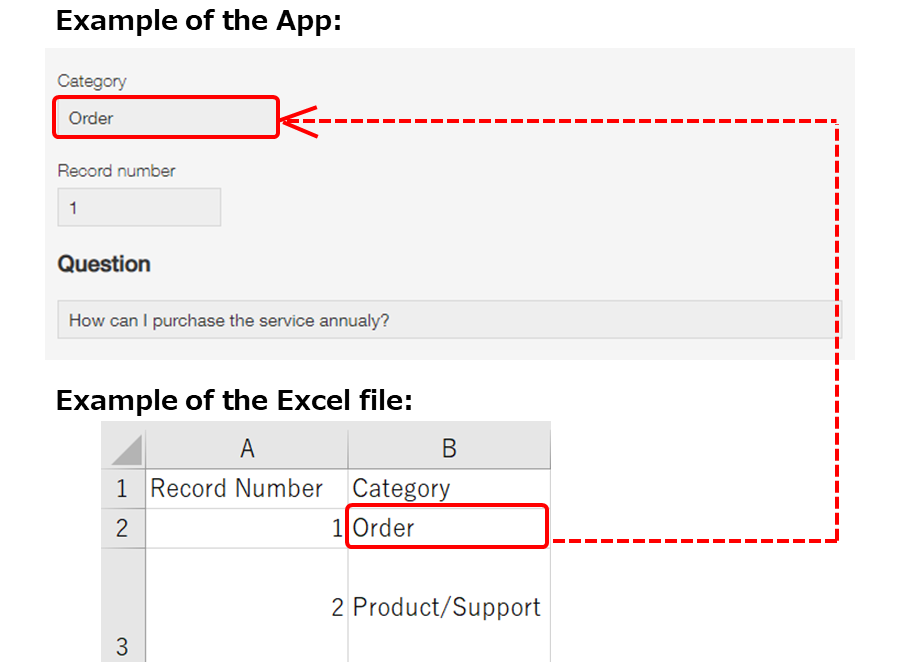
Radio button / Drop-down
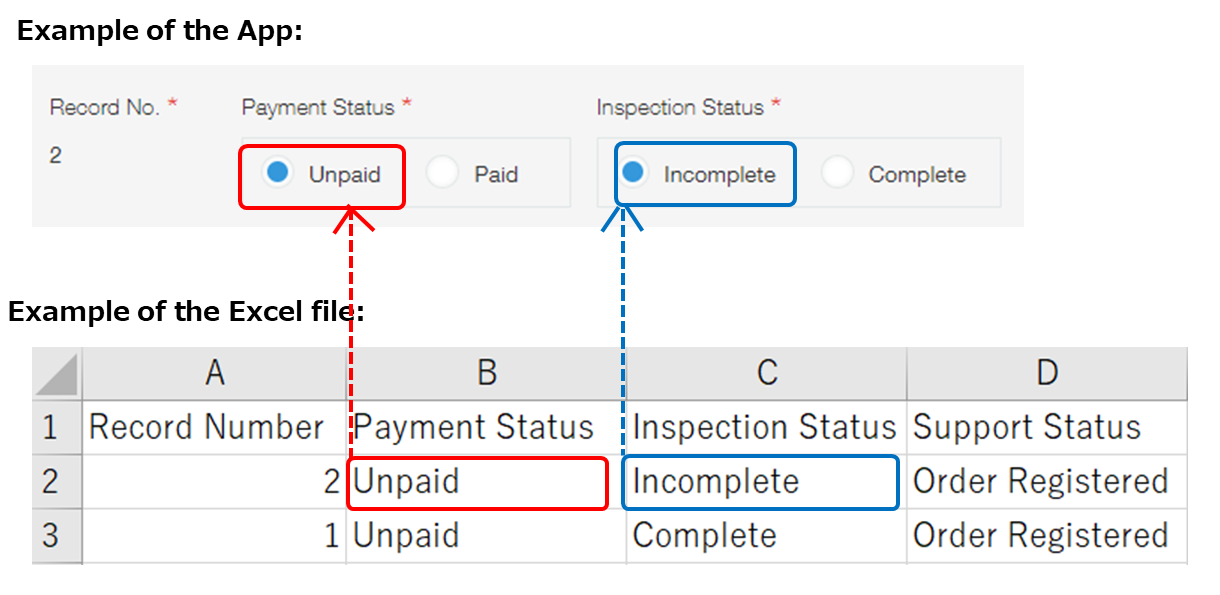
Use one column per field, and enter the name of the option to be selected.
Date
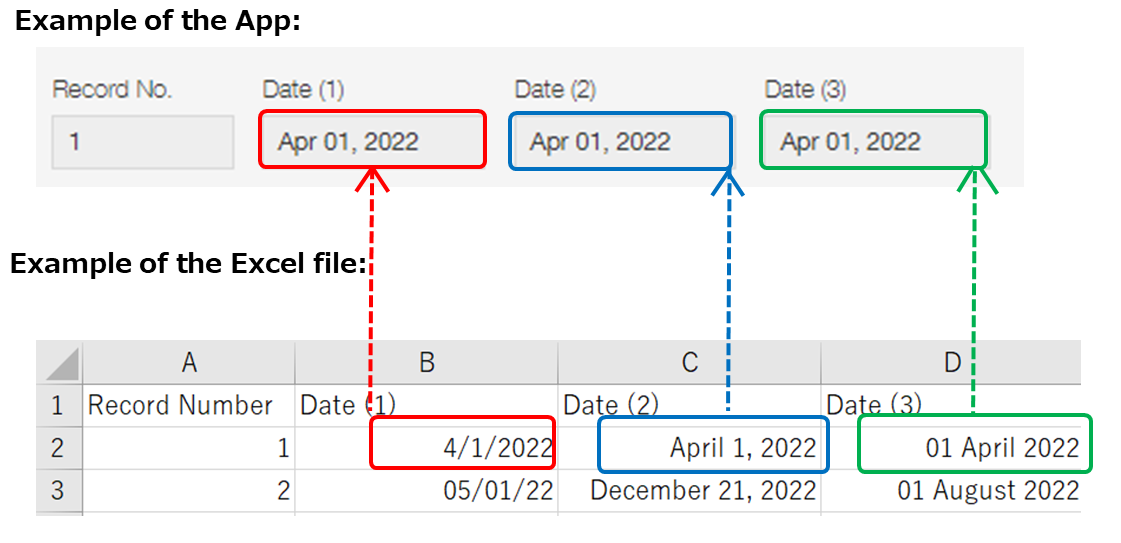
- If your file for import is an Excel file, data for this field type can be entered in any date format that is recognized as a date in Excel.
- If your file for import is a CSV file, enter data for this field type in any of the following formats:
- YYYY-MM-DD (Example: 2022-4-1)
- YYYY/MM/DD (Example: 2022/4/1)
- YYYYMMDD (Example: 20220401)
- YY/MM/DD (Example: 22/4/1)
- MM/DD/YYYY (Example: 4/1/2022)
- MM/DD/YY (Example: 4/1/22)
- DD/MM/YYYY (Example: 1/4/2022)
- DD/MM/YY (Example: 1/4/22)
- Single-digit months and days can be entered in either the single- or double-digit format. For example, you can enter either "4" or "04" to indicate April.
However, when entering values in the "YYYYMMDD" format in CSV files, use the double-digit format. For example, enter "04" to indicate April. - You can enter dates between 00:00 (UTC) January 1, 1000 and 23:59 (UTC) December 31, 9999.
- If the day part is omitted, it is assumed that 1 is specified as the day.
Example: "2022/01" is converted into "2022/01/01" when the file is imported into the app. - If the month and day are omitted, it is assumed that January 1 is specified as the month and day.
Example: "2022" is converted into "2022/01/01" when the file is imported into the app.
Time fields
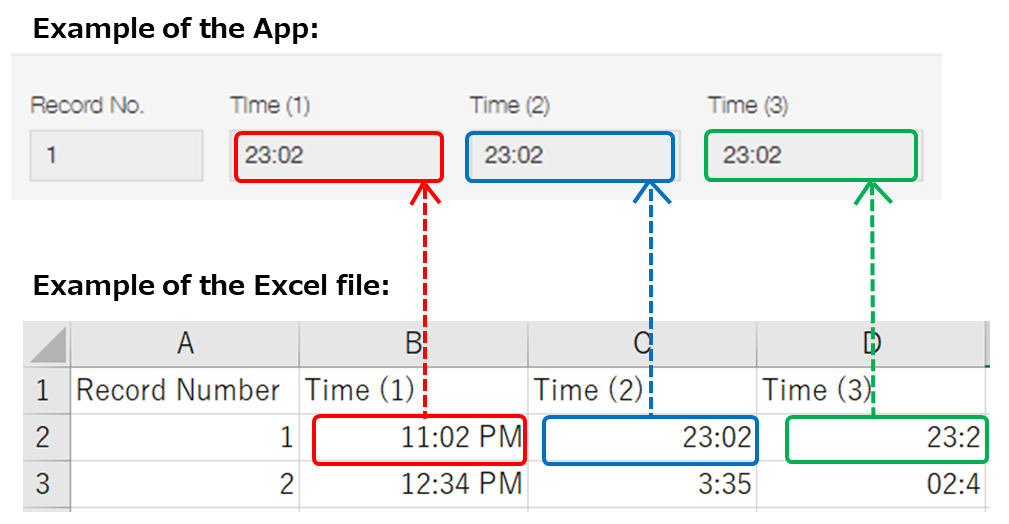
- If your file for import is an Excel file, data for this field type can be entered in any time format that is recognized as time in Excel.
- If your file for import is a CSV file, enter data for this field type in any of the following formats:
- HH:MM AM/PM
Example: "11:02 PM" - HH:MM
Example: "23:02"
- HH:MM AM/PM
- Single-digit hours and minutes can be entered in either the single- or double-digit format. For example, you can enter either "8" or "08" to indicate eight o'clock.
- The seconds part will not be imported even if it is included in the data.
Example: "11:01:25" is converted into "11:01". - If the minutes part is omitted, it is assumed that 0 is specified as the minutes.
Example: "11" is converted into "11:00".
Date and time
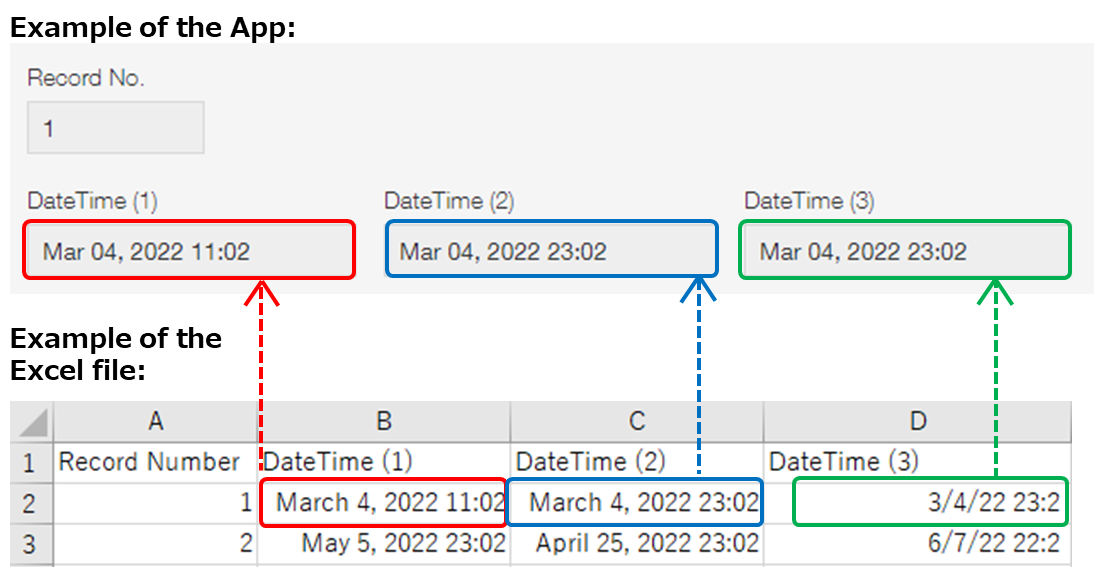
How to enter date and time data
When entering Date and time field data in a file, make sure to note the following.
- The seconds part will not be imported, even if it is included in the data.
- If the time part is omitted, it will be assumed that 00:00 is specified as the time.
Example: "2022/01/11" is converted into "2022/01/11 00:00" when the file is imported into the app.
Date and time formats
For Excel files
If your file for import is an Excel file, data for this field type can be entered in any date and time format that is recognized as date and time in Excel.
For CSV files
For CSV files, the date is followed by the time, separated by a space.
Example: "2022/01/11 11:01"
Enter data in one of the following formats:
- YYYY-MM-DD HH24:NN (Example: "2022-12-20 23:20")
- YYYY-MM-DDTHH24:NN (Example: "2022-12-20T23:20")
- YYYY-MM-DDTHH24:NNZ (Example: "2022-12-20T23:20Z")
- YYYYMMDDHH24NN (Example: "202212202320")
- YYYY/MM/DD HH12:NN AM/PM (Example: "2022/12/20 11:20 PM")
- YYYY/MM/DD HH24:NN (Example: "2022/12/20 23:20")
- MM/DD/YYYY HH12:NN AM/PM (Example: "12/20/2022 11:20 PM")
- MM/DD/YYYY HH24:NN (Example: "12/20/2022 23:20")
- DD/MM/YYYY HH12:NN AM/PM (Example: "20/12/2022 11:20 PM")
- DD/MM/YYYY HH24:NN (Example: "20/12/2022 23:20")
Handling of time zones
The handling of time zones during file import varies depending on whether the data in the Date and time field of your CSV, TXT, or TSV file includes time zone information.
If time zone information is included
- When using the new file import screen:
The date and time values are registered using the time zone specified in the file. - When using the classic file import screen:
The date and time values are registered using the time zone specified in the file.
While you can set a time zone on the Import from file screen, this setting will be ignored.
If time zone information is not included
- When using the new file import screen:
The date and time values are registered based on the time zone set in the importing user's profile. - When using the classic file import screen:
The date and time values are registered using the time zone specified on the Import from file screen.
Link (URL)
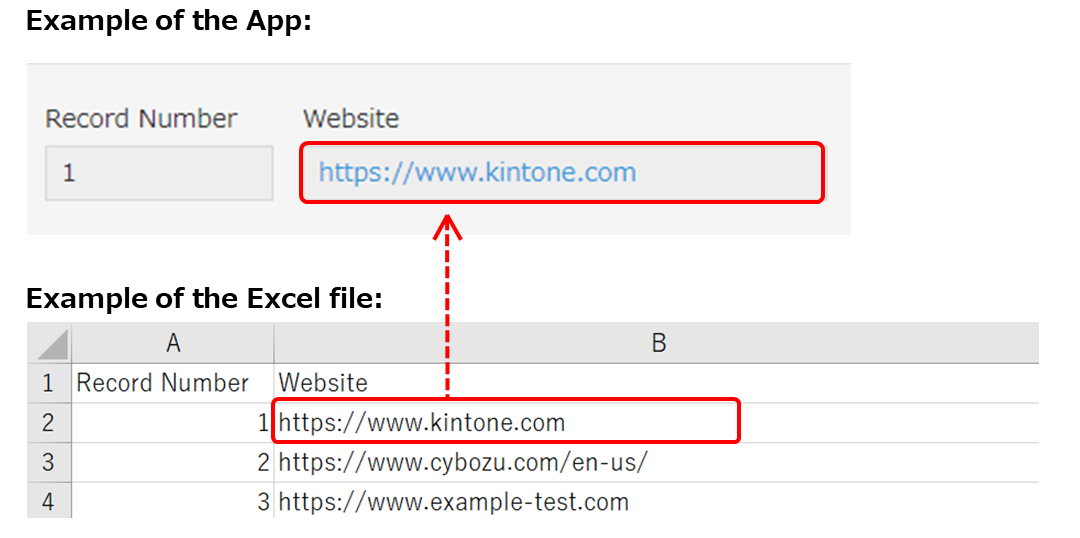
- Enter a URL that begins with "http://" or "https://".
- The URL can contain the following characters:
- Alphabetic characters (uppercase and lowercase)
- Arabic numerals
- The following special characters:
-_.!~*'():@&=+$,;?/#%
Some special characters may not be usable for certain parts of the URL.
Link (Telephone number)
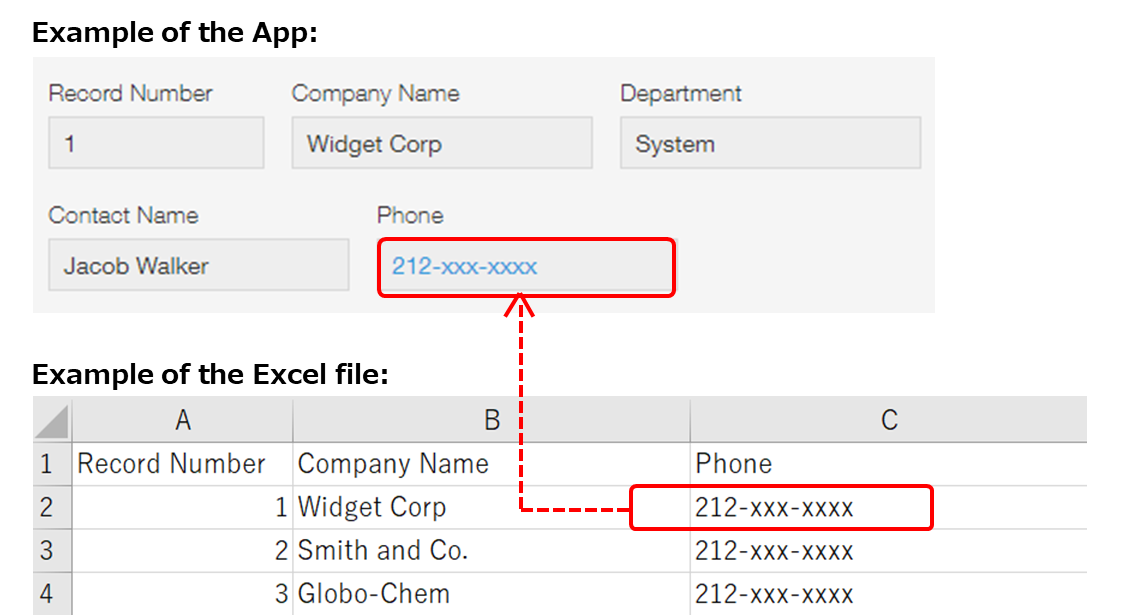
- Enter a telephone number.
- Telephone numbers can be entered with or without hyphens.
Link (Email address)
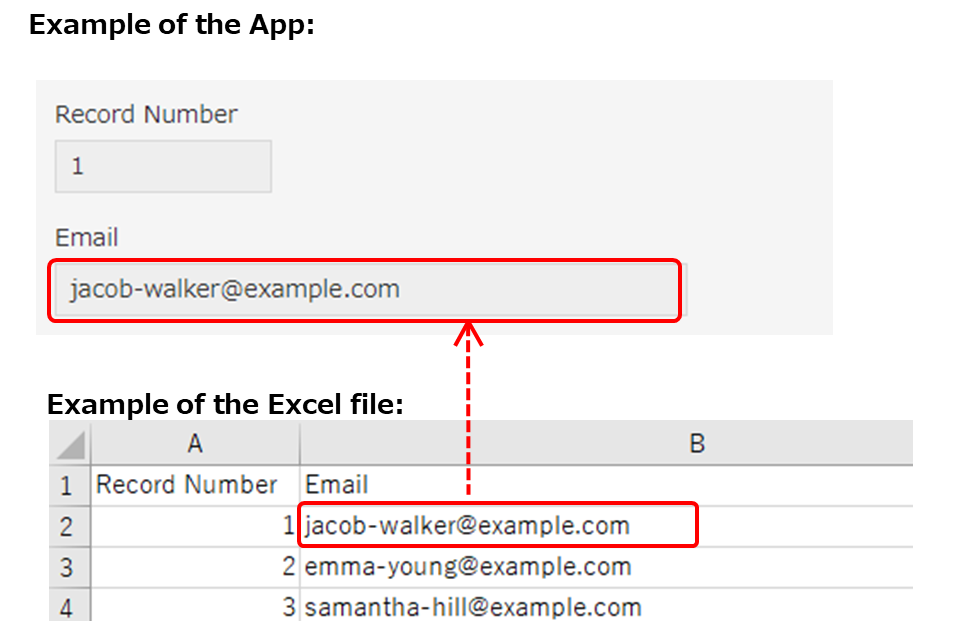
- Enter an email address in the following format: "local-part@domain".
- The local part can contain the following characters:
- Alphabetic characters (uppercase and lowercase)
- Arabic numerals
- The following special characters:
.!#$'%&*+/=?^_-`{}|~
- The domain can contain the following characters:
- Alphabetic characters (uppercase and lowercase)
- Arabic numerals
- The following special characters:
.-
User selection
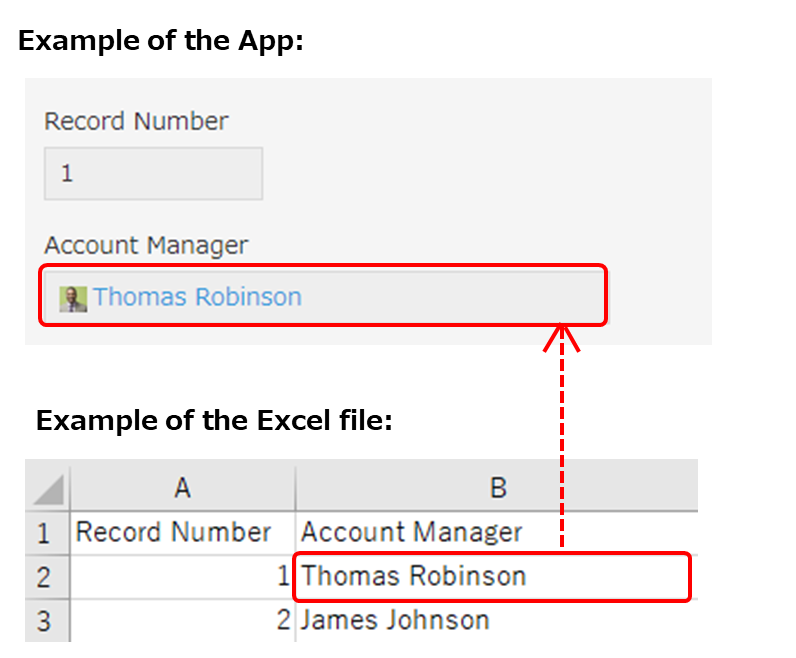
- Enter the login name of the user to be selected.
- If you want multiple users to be selected in the field, enter their login names with line breaks between each login name.
- If you are editing your file for import using Excel or other spreadsheet software, enter the users' login names in a single cell and separate them using line breaks.
- If you are editing your CSV file for import using a text editor, enter the users' login names as a single value (field) in the file and separate them using line breaks.

- If you want to register a guest user, enter "guest/" at the beginning of the guest user's email address (login name).
Department selection
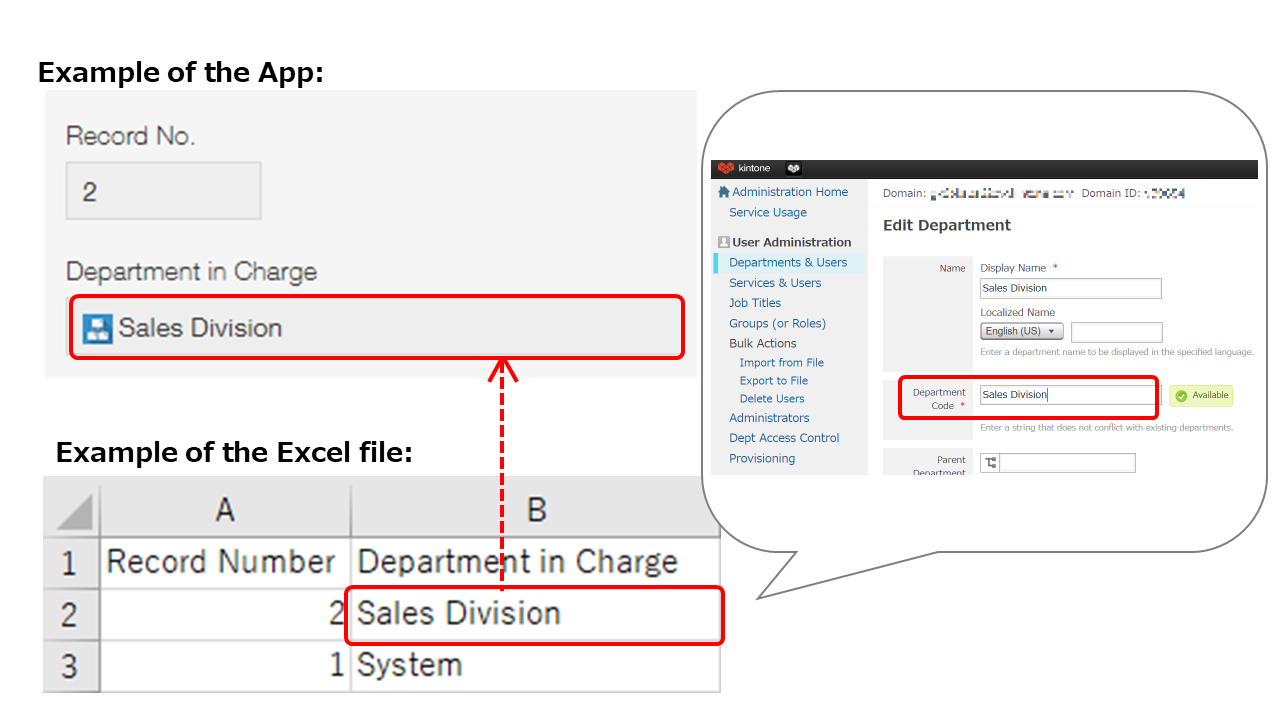
-
Enter the department code of the department to be selected.
-
If you want multiple departments to be selected in the field, enter their department codes with line breaks between each department code.
- If you are editing your file using Excel or other spreadsheet software, enter the department codes in a single cell and separate them using line breaks.
- If you are editing your CSV file for import using a text editor, enter the department codes as a single value (field) in the file and separate them using line breaks.
Group selection
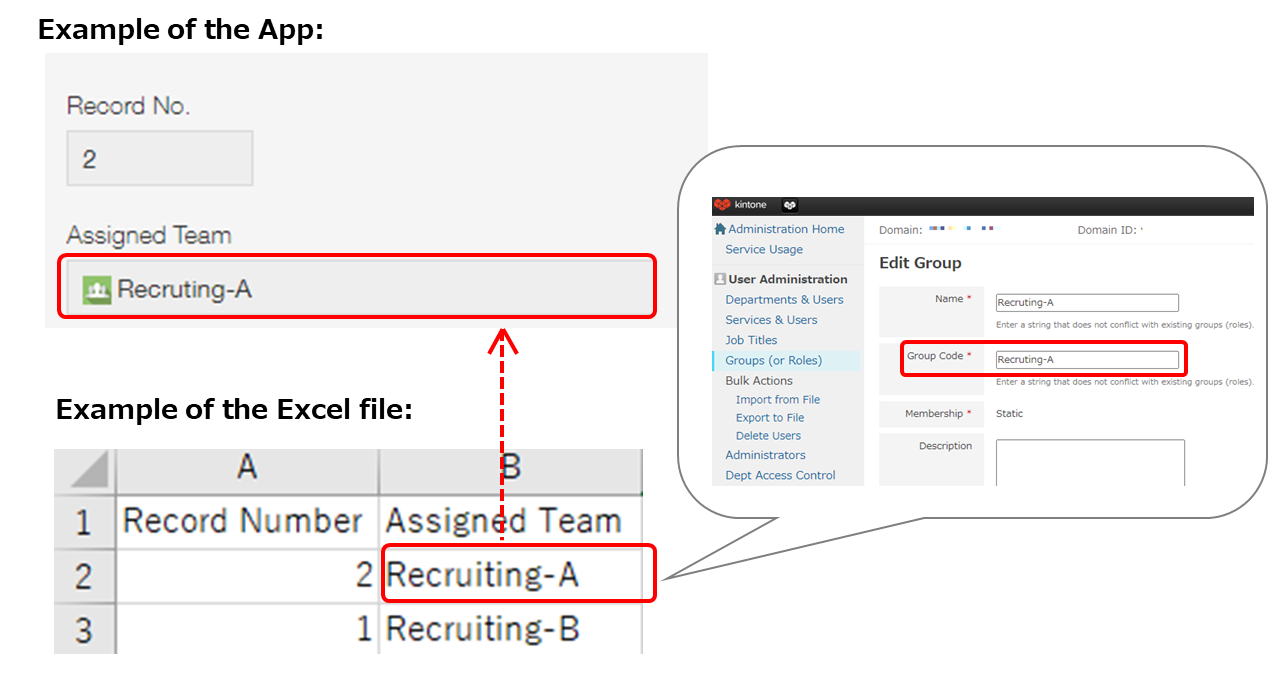
-
Enter the group code of the group to be selected.
-
If you want multiple groups to be selected in the field, enter their group codes with line breaks between each group code.
- If you are editing your file using Excel or other spreadsheet software, enter the group codes in a single cell and separate them using line breaks.
- If you are editing your CSV file for import using a text editor, enter the group codes as a single value (field) in the file and separate them using line breaks.
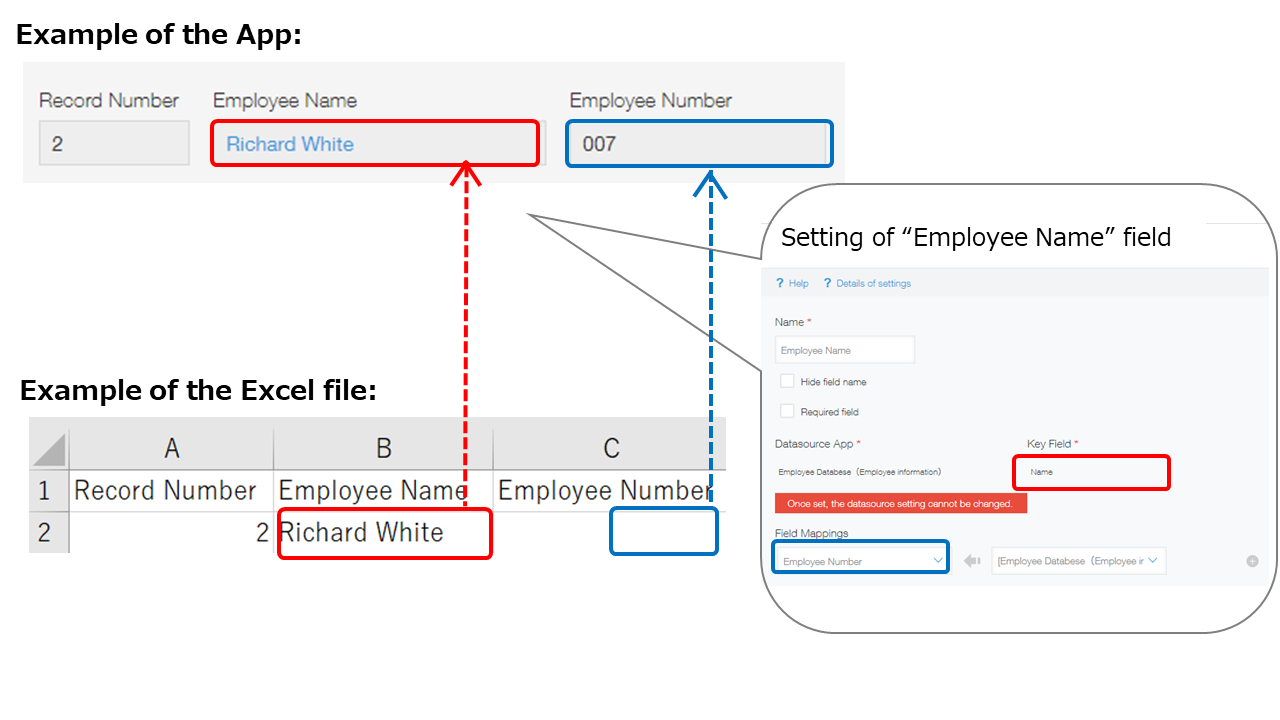
Lookup
- Enter values of the field that is set as the Key field in the Lookup field settings in the app.
Example: If you want to import values into a field called "Employee Name" that has a field from a different app called "Name" specified as the Key field in its settings, enter values from the "Name" field in your file for import. - When your file is imported, values for the fields specified under Field mappings in the Lookup field settings are retrieved again. Therefore, you do not need to enter the values in the file.
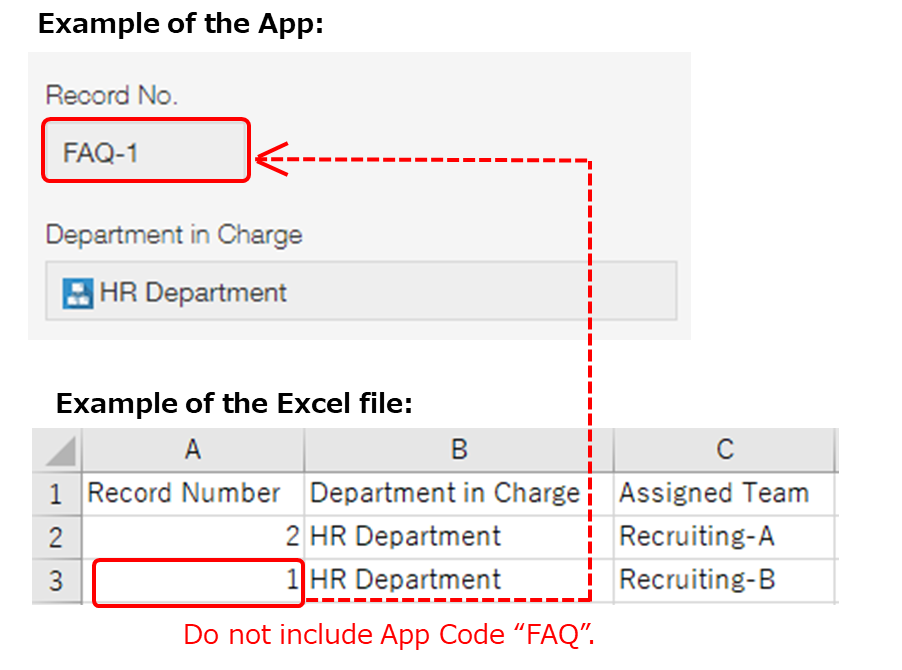
Record number
- When updating existing records by file import:
If you want to specify record numbers in your Update key (formerly called Key to bulk update), enter the record numbers of the records that you want to update in the file for import. - When creating new records by file import:
Do not enter record numbers in the row for records to be newly added.
If your record numbers contain an app code, enter the record numbers without the app code. (E.g., if a record number appears as "kintone-1", enter only "1".) For information on app codes, refer to the following page.
Setting an app code
Categories
- Enter the name of the category you want to specify.
- If you want to specify multiple categories, enter each category name on a separate line.
- If you are editing your file using Excel or other spreadsheet software, enter the category names in a single cell and separate them using line breaks.
- If you are editing your CSV file for import using a text editor, enter the category names as a single value (field) in the file and separate them using line breaks.
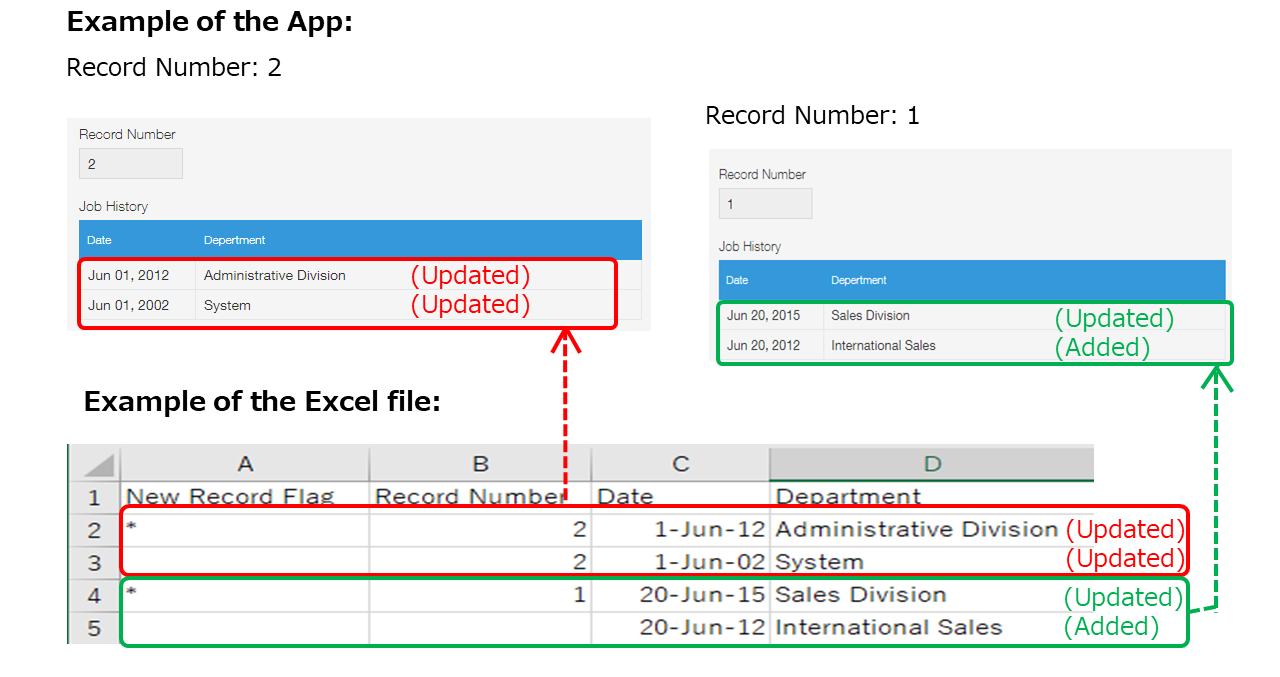
Table
Use separate columns for each field inside the table. Use as many rows as there are in the table to enter data for fields inside the table.
- Enter data in the first column of your file in the following manner:
- In the first row, enter "New record flag".
- Enter an asterisk (*) in the row where each record's data begins, and leave the other rows blank. The data from a row with an asterisk (*) to the row above the next row with an asterisk (\*) is recognized as the data of a single record.
- In the scenario where you update existing record data, if you want to add rows to an existing table in a record, insert rows in the file and enter in these rows the data to be registered in the fields of new table rows.
If the inserted rows are not the first row of the record, leave the first column (the "New record flag" column) blank. - When you update table data in existing records, your file for import must contain data for all of the fields in the table, including field data that is not to be updated. As an exception, your file for import does not need to contain field data that will be re-calculated or retrieved again.
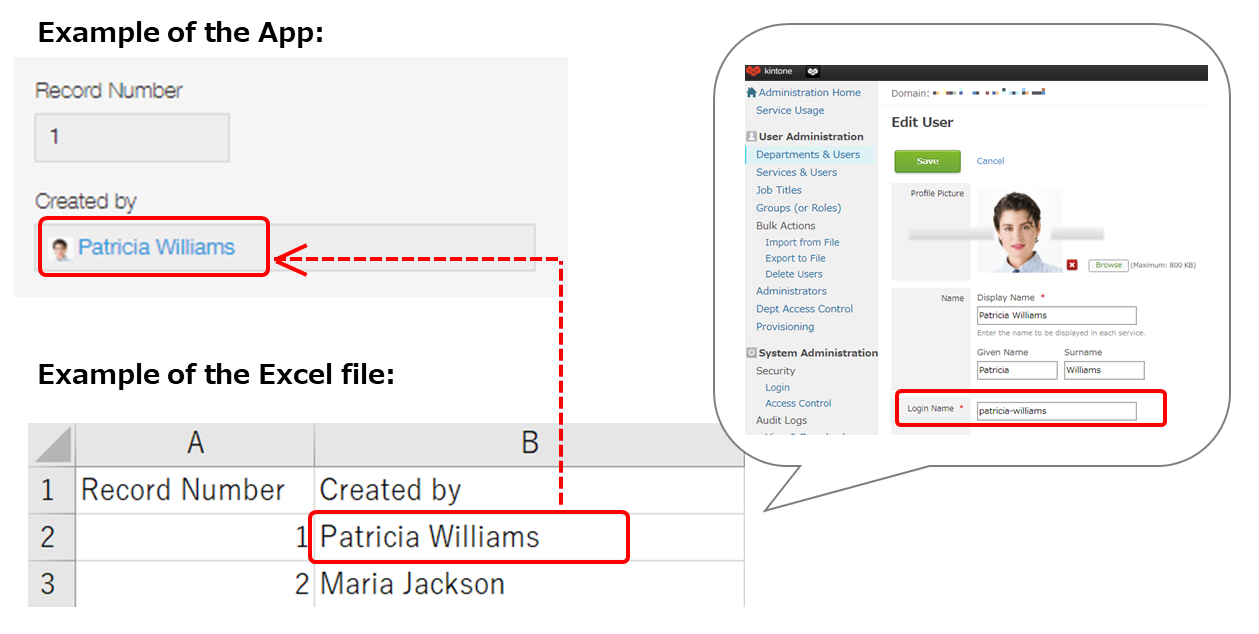
Created by / Updated by
For a Created by or Updated by field value, enter one user login name.
How data is applied after file import
The Created by and Updated by fields are handled differently from other fields during file import.
- When updating existing records by file import:
The values of Created by and Updated by fields cannot be updated using the values in the file. The result after import is as follows:- Created by field values are not updated. The original values are retained.
- Updated by field values are not updated with the values in the file. Instead, this field is automatically updated with the name of the user who imported the file.
- When creating new records by file import:
- Records are updated with the values in the file.
- If (None) is selected, the Created by and Updated by fields will be set to the user who imported the file.
Values and users that cannot be specified
You cannot specify the following values and users.
- A value other than login name
- Multiple users
- A user who does not exist
- An inactive or a deleted user
- A user who is not using Kintone
- A user in the department for which you do not have view permission
- (If the destination app of the file import belongs to a guest space) A guest user who is not the member of the guest space
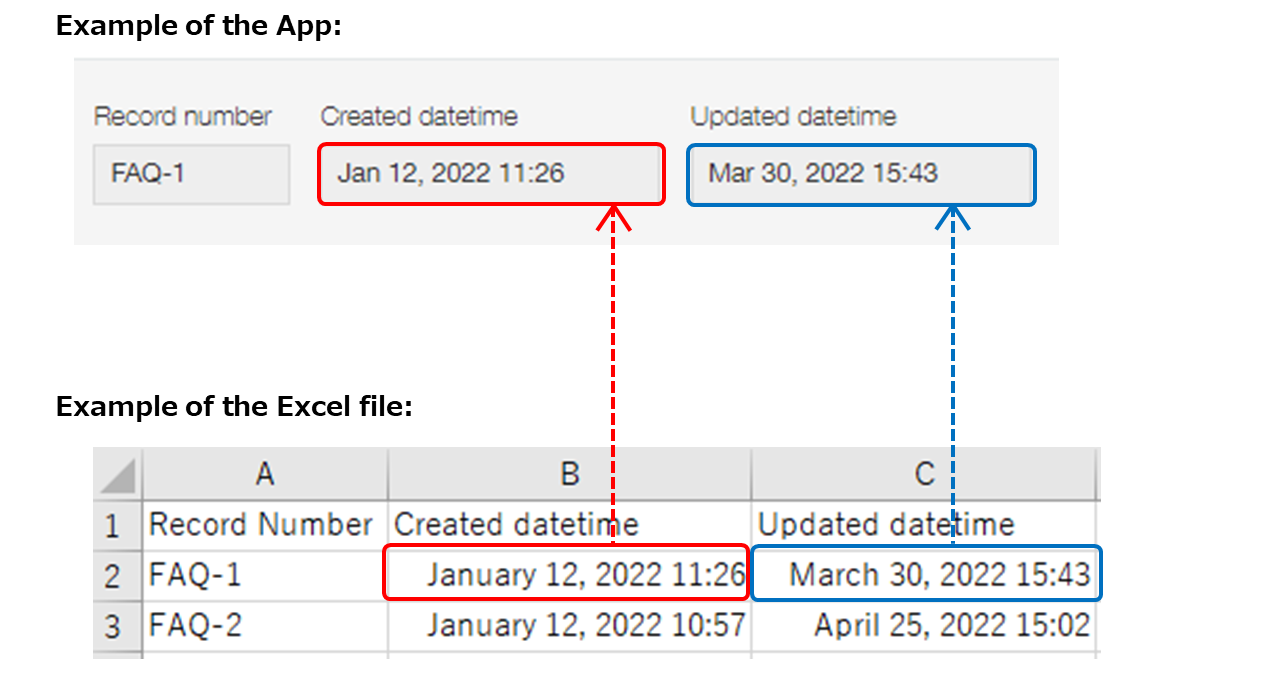
Created datetime / Updated datetime
How data is applied after file import
The Created datetime and Updated datetime fields are handled differently from other fields during file import.
- When updating existing records by file import:
The values of Created datetime and Updated datetime fields cannot be updated using the values in the file. The result after import is as follows:- Created datetime field values are not updated. The original values are retained.
- Updated datetime field values are not updated. Instead, this field is automatically updated with the date and time when the file was imported.
- When creating new records by file import:
- Records are updated with the values in the file.
- If (None) is selected, the Created datetime and Updated datetime fields will be set to the date and time when the file was imported.
How to enter date and time data
When entering Created datetime or Updated datetime field data in a file, make sure to note the following.
- Enter the date and time that is before the date and time at which your file is imported.
- The seconds part will not be imported, even if it is included in the data.
- If the time part is omitted, it will be assumed that 00:00 is specified as the time.
Example: "2014/01/11" is converted into "2014/01/11 00:00" when the file is imported into the app.
Date and time formats
For Excel files
Data for this field type can be entered in any date and time format that is recognized as date and time in Excel.
For CSV files
For CSV files, the date is followed by the time, separated by a space.
Example: "2022/1/12 11:26"
Enter data in one of the following formats:
- YYYY-MM-DD HH24:NN (Example: "2022-12-20 23:20")
- YYYY-MM-DDTHH24:NN (Example: "2022-12-20T23:20")
- YYYY-MM-DDTHH24:NNZ (Example: "2022-12-20T23:20Z")
- YYYYMMDDHH24NN (Example: "202212202320")
- YYYY/MM/DD HH12:NN AM/PM (Example: "2022/12/20 11:20 PM")
- YYYY/MM/DD HH24:NN (Example: "2022/12/20 23:20")
- MM/DD/YYYY HH12:NN AM/PM (Example: "12/20/2022 11:20 PM")
- MM/DD/YYYY HH24:NN (Example: "12/20/2022 23:20")
- DD/MM/YYYY HH12:NN AM/PM (Example: "20/12/2022 11:20 PM")
- DD/MM/YYYY HH24:NN (Example: "20/12/2022 23:20")
Handling of time zones
The handling of time zones during file import varies depending on whether the data in the Created datetime and Updated datetime fields of your CSV, TXT, or TSV file includes time zone information.
If time zone information is included
- When using the new file import screen:
The date and time values are registered using the time zone specified in the file. - When using the classic file import screen:
The date and time values are registered using the time zone specified in the file.
While you can set a time zone on the Import from file screen, this setting will be ignored.
If time zone information is not included
- When using the new file import screen:
The date and time values are registered based on the time zone set in the importing user's profile. - When using the classic file import screen:
The date and time values are registered using the time zone specified on the Import from file screen.
If an error appears and you cannot import your file
Refer to the following page to resolve the error, then try importing your file again.
What to do if adding/updating records in bulk failed
Sample file with appropriate formatting for each field type
For your reference, this article provides a sample file that shows the appropriate formatting for each field type. To check the appropriate formatting for each field type, download the following file with samples for all of the fields. (Only available in Japanese.)
sample_all_fields_app.csv