Importing record data from a file into an app
You can add new records or update existing ones by importing data from a file into an app. You can also add new rows or update existing rows of tables in records.
This article explains how to import file data into an existing app, along with points to keep in mind when importing file data.
- Preparing to import a file
- Points to note before importing a file
- Key points of the "Import from file" operation
- Steps to import a file (with the new file import method)
- Steps to import a file (with the classic file import method)
- If you can't click the "Import" button
Preparing to import a file
Before importing data from a file into an app, make sure that both the app and the file are properly prepared.
Preparing the app
Before importing data from your file, make sure that the app's settings and permissions are configured correctly.
- To import data from a file, you need to be granted the "Import from file" permission in the Permissions for app settings.
- Additionally, to import data into the Created by, Created datetime, Updated by, and/or Updated datetime fields when creating new records via file import, you must have the "Manage app" permission.
- The app settings also need to be configured so that you can register and update data via file import. For details, refer to the following page.
Checking the destination app for file import
Preparing the file
Before importing data from your file, make sure the file's format and contents are properly prepared.
- The file formats supported for file import are Excel format (xlsx), CSV format (csv), TXT format (txt), and TSV format (tsv).
- Make sure the file is formatted correctly for import. For details, refer to the following page.
Preparing a file for adding/updating records
Points to note before importing a file
Before importing data from your file, make sure to check the following important notes.
- It is recommended that you create a backup of existing records by exporting them to a file before importing data into the app. For the steps to do so, refer to the following page.
Exporting data to a file - Depending on the field types used and how the field settings are configured, there may be cases where a field does not accept data registration/update via file import. For details, refer to the following sections.
- While data is being imported into the app from the file, you may not be able to add or update records, either in Kintone or via API.
Key points of the "Import from file" operation
When importing data from your file, the following two settings are especially important.
- Specifying a field as the Update key (or Key to bulk update with the classic file import method)
- Specifying corresponding file columns
Specifying a field as the "Update key" (or "Key to bulk update" with the classic file import method)
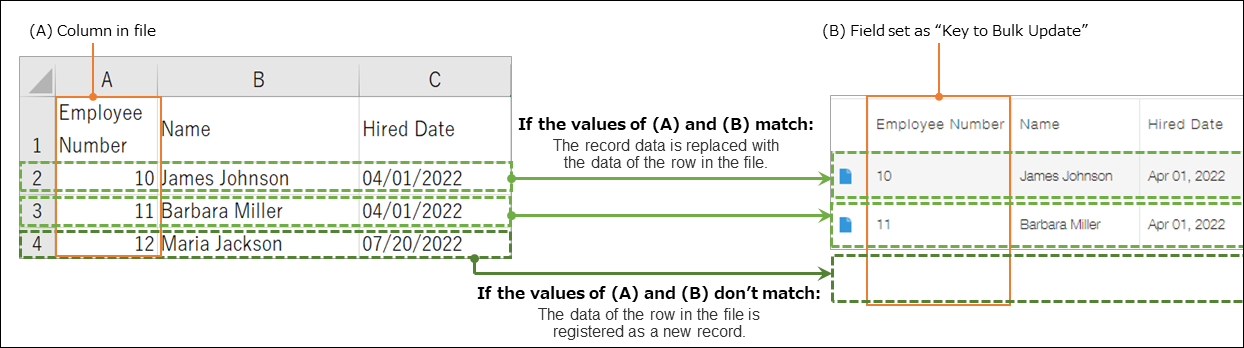
When updating existing records, specify which field will be used as the Update key.
About the "Update key"
The app field specified as the Update key is used to link app records with rows of data in the file being imported.
When you import your file, whether existing records are updated or new ones are added depends on whether the value in the app field specified under Update key matches a value in the corresponding column in your file.
How data is updated
- If a value in the app field specified under Update key matches a value in the corresponding column in your file: The corresponding existing record will be updated with the data in your file.
- If a value in the app field specified under Update key does not match a value in the corresponding column in your file: A new record will be added with the data from that row in your file.
Fields that can be specified under "Update key"
One of the following fields can be set under Update key.
- Record number
- Text
- Number
- Date
- Date and time
- Link
Notes on specifying an update key
When specifying a field as an update key, make sure to keep in mind the following.
- The field set under Update key must be one that does not accept duplicate values across multiple records.
- The Record number field contains unique values automatically assigned when each record is added, ensuring no duplicates exist in the same app. For this reason, it is often set under Update key.
- However, if you set the Record number field as the Update key, an error will occur if the corresponding file column contains a record number that does not exist in the app.
- If you want to have new records added when using the Record number field as the update key, leave their value in the corresponding file column blank when you input the data in your file.
- If you want to set a field other than the Record number field (a Text, Number, Date, Date and time, or Link field) as the Update key, you need to enable Prohibit duplicate values for the field in its field settings.
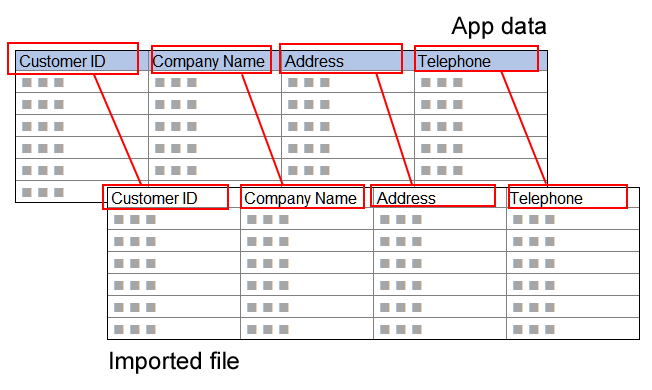
Specifying corresponding file columns
Specify which column to import data from for each field in the app.
Fields that are not displayed
If a field into which you want to import file data is not displayed under App field (or [Field in app] with the classic file import method), it means the field does not accept data registration/update via file import or you do not have permission to view or edit the field.
For example, fields whose values are calculated or retrieved based on the values of other fields (e.g., fields that have formulas set) do not appear under App field (or [Field in app] with the classic file import method). The values of these fields will be re-calculated or retrieved again when file data is imported.
For information on such fields, refer to the following page.
Checking the destination app for file import
Required fields
When creating new records via file import, you need to specify corresponding file columns for the app's required fields (fields marked with an asterisk (*)).
Also, if you are updating existing records with data that does not include values for some of the app's required fields, you still need to specify corresponding file columns for the required fields.
Fields whose values you don't want to update
If you do not want to update the values of some fields, select (None) for these fields.
- In records that are newly added via file import, fields for which (None) is selected will be left empty or have their default value input (if a default value is set).
- In existing records, the fields will retain their registered values.
Especially when you are updating existing records, make sure to select (None) for fields whose values you do not want to update. This will prevent existing records from accidentally being updated with old data.
Updating table data
Fields placed in a table are displayed in the following format: "Table name > Field name".
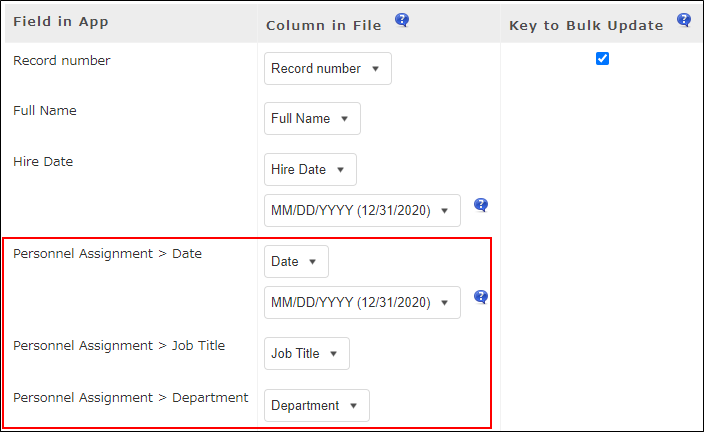
If you want to update table data in existing records via file import, specify the corresponding file columns for all of the fields in the table that are displayed under App field (or Field in app with the classic file import method).
You must also specify the corresponding file columns for fields whose data has not been modified in the file so that these fields are also included in the scope of file import.
Record creation/update information
Created by, Created datetime, Updated by, and Updated datetime fields in the Record creation/update information section are handled differently from other fields during file import.
- When updating existing records by file import:
The Created by, Created datetime, Updated by, and Updated datetime fields of existing records cannot be updated with values from the file. The result after import is as follows:- Created by and Created datetime field values are not updated. The original values are retained.
- Updated by and Updated datetime field values are not updated. Instead, these fields are automatically set with the name of the user who imported the file and the date and time when the file was imported.
- When creating new records by file import:
- Records are updated with the values in the file.
- If you select (None) for the Created by, Created datetime, Updated by, and Updated datetime fields, they will be set with the name of the user who imported the file and the date and time when the file was imported.
Steps to import a file (with the new file import method)
This section describes the steps to import a file when the new file import screen is enabled in your update options settings.
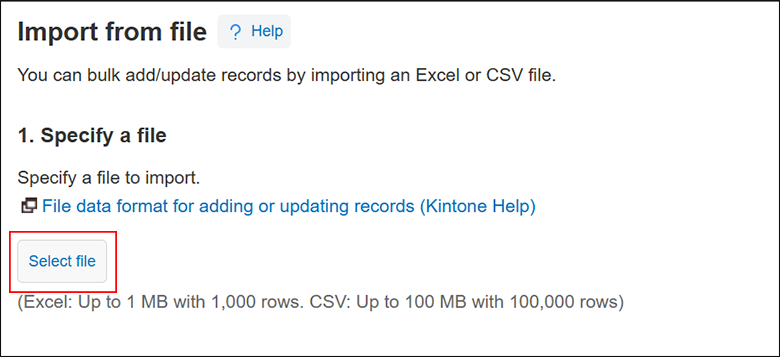
Specify a file
-
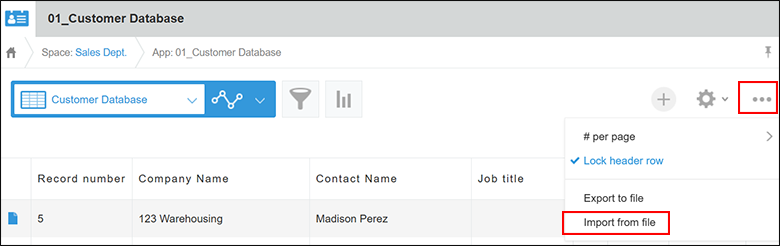
Click the Options icon (the three dots) at the upper right of the View screen, then click Import from file.
If Import from file is not displayed, you need to be granted the "Import from file" permission in the Permissions for app settings.
Configuring permissions for apps
-
Click Select file and select a file to import.
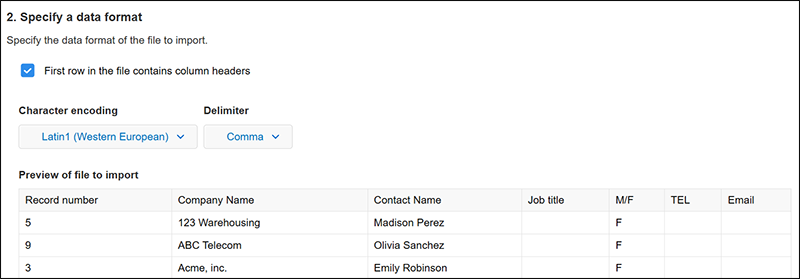
Specify a data format
-
Select whether the first row in the file contains column headers.
If the first row of your file contains column names, select the First row in the file contains column headers checkbox.
Depending on the content of your file, the checkbox may be automatically selected. -
If you're importing a CSV file, configure the Character encoding and Delimiter settings.
-
Check that the content of your file is correctly displayed under Preview of file to import.
If the content of your file is not displayed correctly, try changing the following settings.- If characters in the file are garbled, select a different option from the Character encoding drop-down list.
- If the file data is not separated into columns correctly, select a different option from the Delimiter drop-down list.
Specify how to import record data and handle errors
-
Under Record data, specify how to import record data from your file.
You can select one of the following options.- Only add new records
- Update and add records
-
If you select Update and add records under Record data, specify which app field to use as the Update key, and select the corresponding column in the file.
The settings to configure are:- Update key
- Corresponding file column
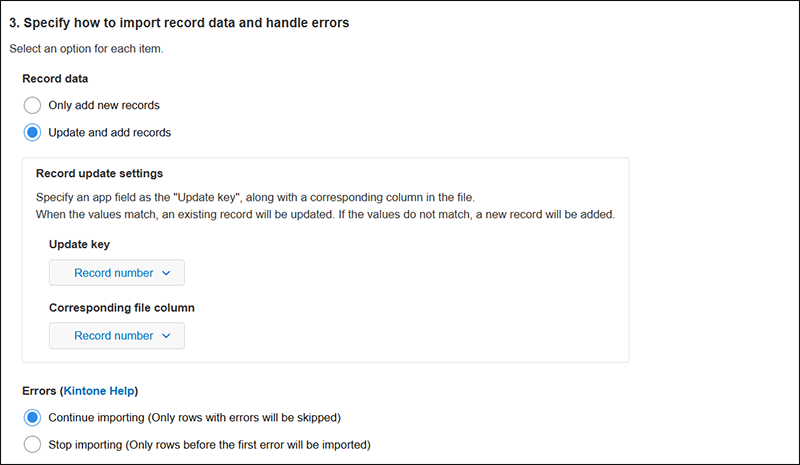
-
Specify how you want import errors to be handled.
You can select one of the following options.- Continue importing (Only rows with errors will be skipped)
- Stop importing (Only rows before the first error will be imported)
For details on the options for handling file import errors, refer to the following page.
Options for handling errors during file import
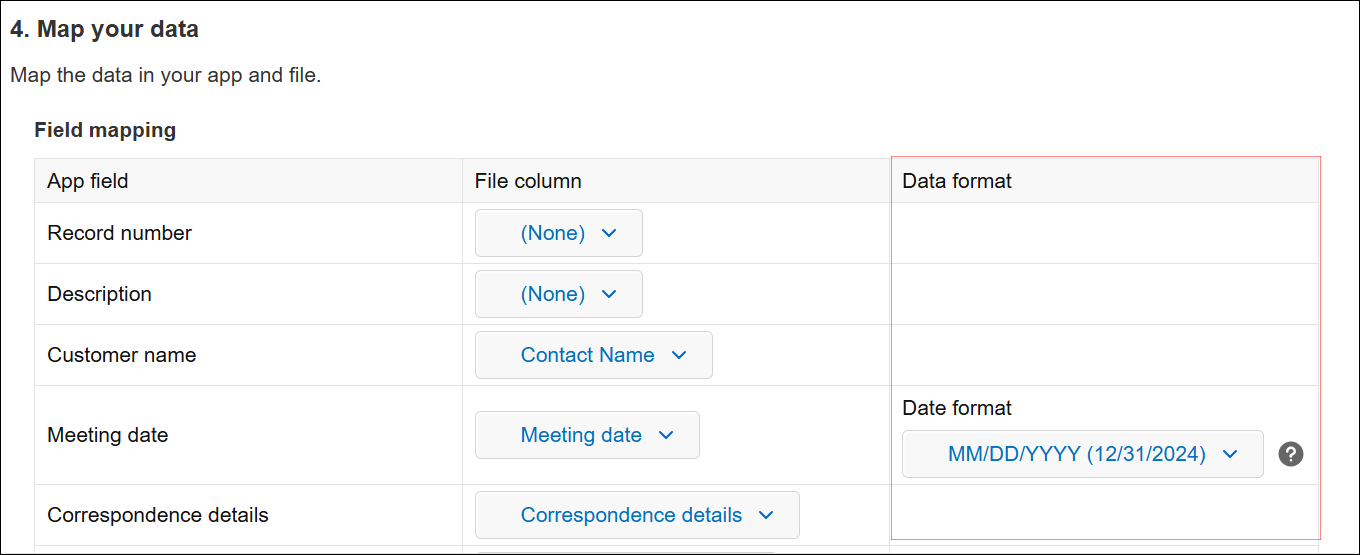
Map your data
-
Under File column, specify which file column to import data from for each field in the app that you want to update.
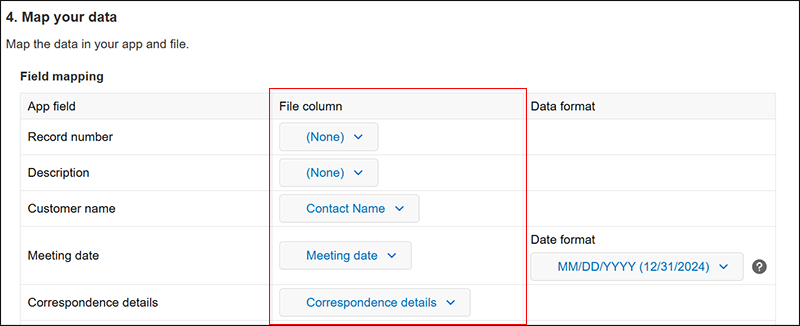 If the file has column names in the first row, the system automatically looks for matches between the column names and the app's field names, and sets columns under File column accordingly.
The basic rules for specifying columns under File column are as follows.- Map the columns under File column to the fields under App field.
- If you do not want to register or update values for some fields, select (None) for these fields.
-
If you want to import file data into new records, specify corresponding file columns under Column in file for the fields displayed under Record creation/update information.
If fields are not displayed in the Record creation/update information section, you need to be granted the "Manage app" permission in the Permissions for app settings.
Configuring permissions for apps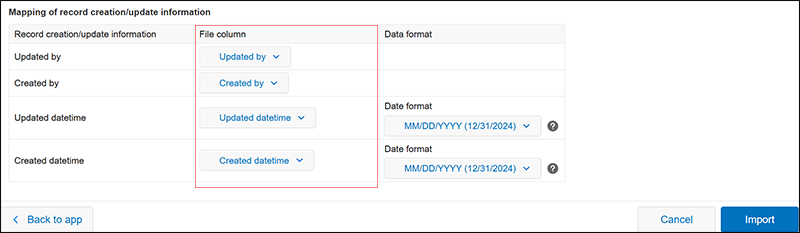
-
Specify data formats if necessary.
- For Date, Date and time, Created datetime, and Updated datetime fields:
- Select one of the following date formats.
- YYYY/MM/DD (2024/12/31)
- MM/DD/YYYY (12/31/2024)
- DD/MM/YYYY (31/12/2024)
- The initially selected date format depends on the language settings of the user who is importing the file.
- If the date uses a separator other than a slash (/)—for example, "2024-12-31" or "20241231"—it will be imported in year-month-day order, regardless of the date format selected from the drop-down list.
- Select one of the following date formats.
- For Date and time, Created datetime, and Updated datetime fields:
- The date and time values imported from the file will be registered based on the time zone set in the profile of the user who imported the file.
- For Number fields:
- Select a period (.) or comma (,) as the decimal separator.
- For Date, Date and time, Created datetime, and Updated datetime fields:
Import the file
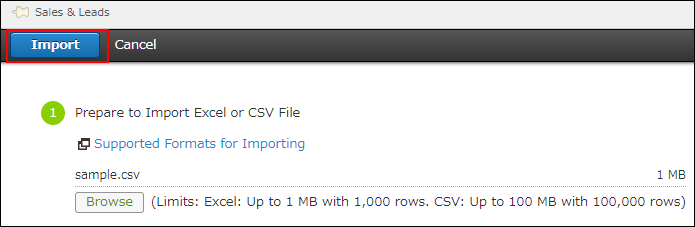
- Make sure the file, data format, import method, and necessary data mappings have been specified, then click Import at the bottom right of the screen.
Steps to import a file (with the classic file import method)
This section describes the steps to import a file when the new file import screen is disabled in your update options settings.
Specify a file
-
Click the Options icon (the three dots) at the upper right of the View screen, then click Import from file.
If Import from file is not displayed, you need to be granted the "Import from file" permission in the Permissions for app settings.
Configuring permissions for apps

-
Click Browse and select a file to import.
Specify a data format
-
Select one of the radio buttons displayed under Select data scope.
If your file has column names in the first row, select First row is header.
Depending on the content of your file, First row is header may be automatically selected.

-
Check that the content of your file is correctly displayed in the Preview section.
The Character encoding and Delimiter drop-down lists are displayed only when you are importing a CSV file.
If the content of your file is not displayed correctly, try changing the following settings.- If characters in the file are garbled, select a different option from the Character encoding drop-down list.
- If the file data is not separated into columns correctly, select a different option from the Delimiter drop-down list.

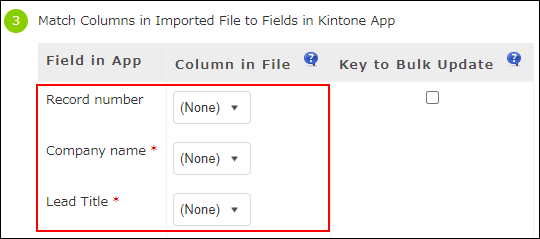
Map your data
-
Under Column in file, specify which file column to import data from for each field in the app that you want to update.
 If the file has column names in the first row, the system automatically looks for matches between the column names and the app's field names, and sets columns under Column in file accordingly.
The basic rules for specifying columns under Column in file are as follows.- Map the columns under Column in file to the fields under Field in app.
- If you do not want to register or update values for some fields, select (None) for these fields.
-
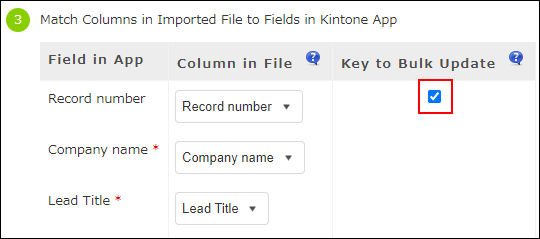
When updating existing records, select the Key to bulk update checkbox.
-
If you want to import file data into new records, specify corresponding file columns under Column in file for the fields displayed under Record creation/update information.
If fields are not displayed in the Record creation/update information section, you need to be granted the "Manage app" permission in the Permissions for app settings.
Configuring permissions for apps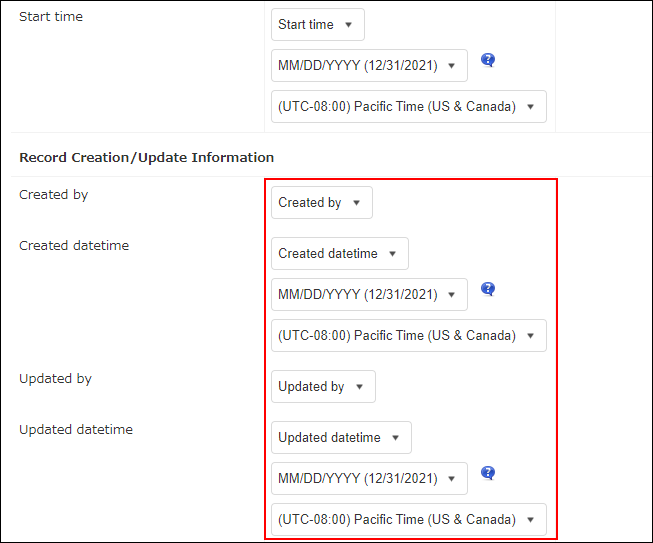
-
Specify data formats if necessary.
- For Date, Date and time, Created datetime, and Updated datetime fields:
- Select one of the following date formats.
- YYYY/MM/DD (2025/12/31)
- MM/DD/YYYY (12/31/2025)
- DD/MM/YYYY (31/12/2025)
- The initially selected date format depends on the language settings of the user who is importing the file.
- If the date uses a separator other than a slash (/)—for example, "2024-12-31" or "20241231"—it will be imported in year-month-day order, regardless of the date format selected from the drop-down list.
- Select one of the following date formats.
- For Date and time, Created datetime, and Updated datetime fields:
- Select the time zone for the date and time being imported.
- The initially selected time zone is based on the profile settings of the user who is importing the file.
- For Date, Date and time, Created datetime, and Updated datetime fields:
Specify how to handle file import errors
-
Select how you want file import errors to be handled.
You can select one of the following options.- Continue importing (Only rows with errors will be skipped)
- Stop importing (No rows after the first error will be imported)
For details on the options for handling file import errors, refer to the following page.
Options for handling errors during file import
Import the file
- Make sure the file, data format, necessary data mappings, and method for handling import errors have been specified, then click Import at the top left of the screen.
If you can't click the "Import" button
Possible causes
If Import is grayed out and cannot be clicked, it may be due to one of the following reasons.
- A file hasn't been specified, or there is no record data in the file.
- Importing the file would exceed the maximum number of records allowed in the app.
- The file contains data that is not specified in the correct format.
- The app's required fields or other necessary fields haven't been mapped to a corresponding file column.
- Either no file column is mapped to one or more fields in a table, or a file column is mapped to one or more fields in a table that cannot be imported. (Applies only when updating existing records.)
Solution
Make changes to your file, or change the file column mappings.
Checking the file import status
When the file import starts, you are automatically navigated to the app's View screen.
 A message is displayed at the top of the View screen, showing you the progress and result of the file import.
Clicking the link in the message takes you to the Imported files screen, where you can check the progress of the import process and details of any errors that occur.
Checking the status of file import