การจัดการตารางเวลาของคุณด้วย Kintone
คุณสามารถแสดงหน้าหลักของแอป Kintone ในรูปแบบปฏิทินได้
สิ่งนี้มีประโยชน์สำหรับแอปที่คุณต้องการจัดการกำหนดการบนปฏิทิน เช่น แอปสำหรับการจัดการกิจกรรมของบริษัทหรือการกำหนดตารางสัมภาษณ์การรับสมัคร
โปรดทราบว่าไม่มีการให้คุณลักษณะกำหนดการเช่นเดียวกับผลิตภัณฑ์กรุ๊ปแวร์อื่น ๆ
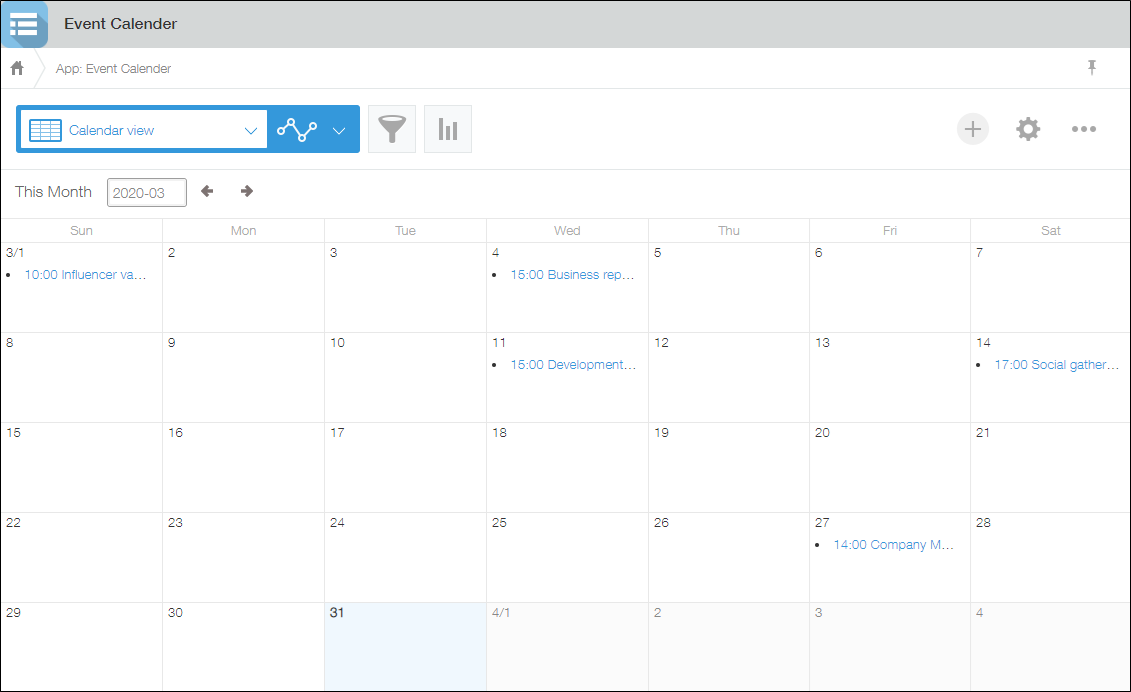
หากต้องการแสดงหน้าหลักของแอปของคุณในรูปแบบปฏิทิน ให้ระบุมุมมองปฏิทินเป็นมุมมองเริ่มต้น
ขั้นตอน
หัวข้อนี้จะอธิบายขั้นตอนการเพิ่มมุมมองปฏิทินให้กับแอปและการแสดงบนหน้าหลักของแอป
คุณต้องได้รับอนุญาตการจัดการสำหรับแอปเพื่อดำเนินการนี้
-
คลิกไอคอน [การตั้งค่าแอป] (ไอคอนรูปเฟือง) ที่ด้านขวาบนของหน้าจอ [ดู]

-
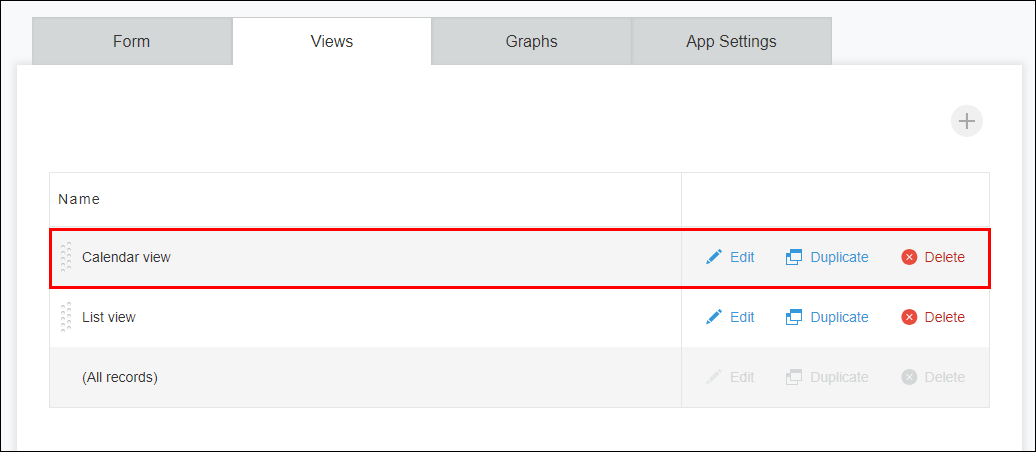
บนหน้าจอ [การตั้งค่าแอป] คลิกแท็บ [มุมมอง]
-
คลิกไอคอน [เพิ่มมุมมองใหม่] (ไอคอนรูปเครื่องหมายบวกที่ด้านขวาของหน้าจอ)

-
บนหน้าจอ [ดู] ให้ป้อนชื่อมุมมองในส่วน [ชื่อ]
-
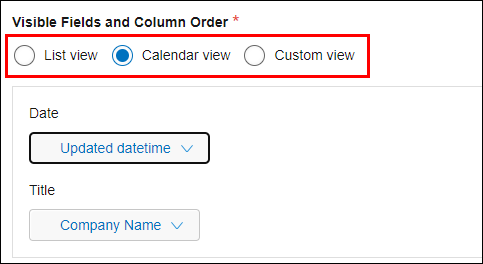
เลือก [มุมมองแบบปฏิทิน] ภายใต้ [ ฟิลด์ที่มองเห็นได้และลำดับคอลัมน์ ]
-
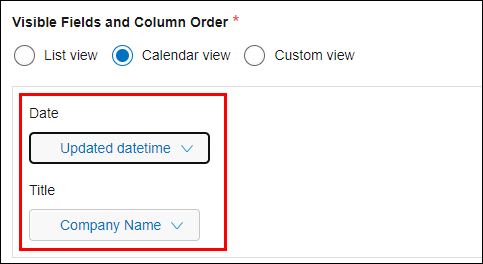
เลือก ฟิลด์สําหรับทั้ง [วันที่] และ [ชื่อเรื่อง]
สําหรับ [วันที่] ให้เลือกฟิลด์ที่จะใช้เป็นวันที่ในปฏิทิน และสําหรับ [ชื่อเรื่อง] ให้เลือกฟิลด์ที่จะแสดงเป็นชื่อเรื่อง
สําหรับรายละเอียด โปรดดูหน้าต่อไปนี้
หากคุณเลือก "มุมมองแบบปฏิทิน "
-
ระบุเงื่อนไขบันทึกภายใต้ [ตัวกรอง และการเรียงลำดับ] ตามความจำเป็น
-
คลิก [บันทึก] ที่ด้านขวาล่างของหน้าจอ
-
บนหน้าจอ [การตั้งค่าแอป] ให้คลิกไอคอน [ลากเพื่อแก้ไขลำดับ] ทางด้านซ้ายของมุมมองที่สร้างขึ้น แล้วลากไปไว้ด้านบนสุดของรายการ มุมมองจะถูกตั้งค่าเป็นค่าเริ่มต้น
-
คลิก [อัปเดตแอป] ที่ด้านขวาบนของหน้าจอ
-
ในกล่องโต้ตอบ [อัปเดตแอป] ให้คลิก [อัปเดตแอป]