การตั้งค่าเว็บฮุก
ด้วยการใช้เว็บฮุกใน Kintone คุณสามารถกำหนดให้บริการภายนอกที่ระบุได้รับข้อมูลเกี่ยวกับการดำเนินการเฉพาะเมื่อดำเนินการบนแอป Kintone
ตัวอย่างเช่น คุณสามารถกำหนดให้บันทึกถูกโพสต์ลงในบริการแชทโดยอัตโนมัติเมื่อเพิ่มลงใน Kintone การผสานรวมแบบนี้สามารถกำหนดค่าได้โดยไม่ต้องเขียนโปรแกรม
เว็บฮุกทำงานอย่างไร
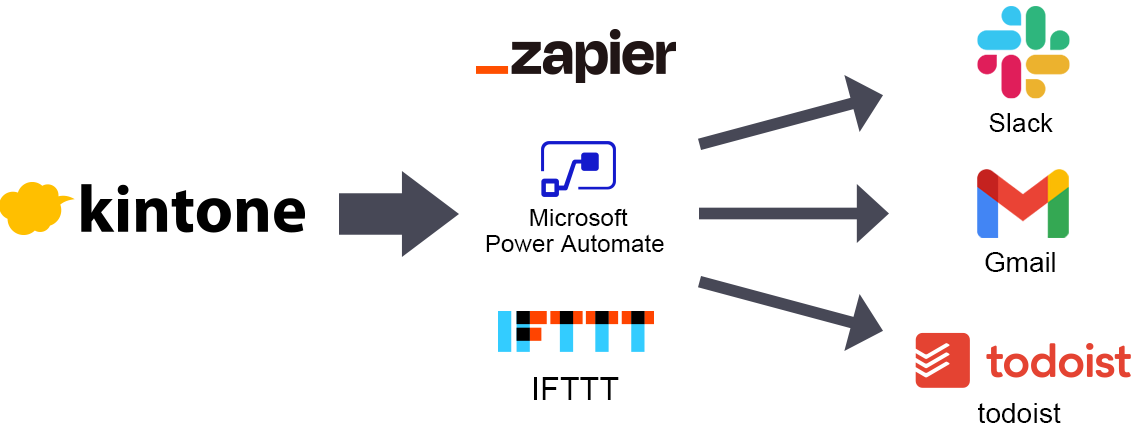
ด้วยการใช้เครื่องมือบูรณาการที่เปิดใช้งานเว็บฮุก คุณสามารถเชื่อมต่อ Kintone เข้ากับบริการที่รองรับโดยเครื่องมือดังกล่าวได้
ตัวอย่างของเครื่องมือดังกล่าว ได้แก่ Zapier, Microsoft Power Automate และ IFTTT
การตั้งค่าเว็บฮุกบนแอป Kintone ช่วยให้คุณสามารถตั้งค่าการแจ้งเตือนสำหรับการดำเนินการแอปต่อไปนี้ได้
- การเพิ่มบันทึก
- การแก้ไขบันทึก
- การลบข้อมูล
- การโพสต์ความคิดเห็น
- การอัพเดตสถานะ (เมื่อสถานะการจัดการกระบวนการได้รับการอัพเดต)
สำหรับรายละเอียดเกี่ยวกับพารามิเตอร์ที่ใช้ในการแจ้งเตือนเว็บฮุกที่ถูกทริกเกอร์โดยการดำเนินการบน Kintone โปรดดู เนื้อหาของการแจ้งเตือนเว็บฮุกที่ถูกทริกเกอร์โดยการดำเนินการบน Kintone
ภาพรวมของการตั้งค่าเว็บฮุก
คุณสามารถตั้งค่าเว็บฮุกได้โดยทำตามขั้นตอนต่อไปนี้
- ตั้งค่าทริกเกอร์โดยใช้เครื่องมือการรวม (เช่น Zapier)
- ตั้งค่าเว็บฮุกบน Kintone
- ตั้งค่าการดำเนินการโดยใช้เครื่องมือการรวม
ตัวอย่างการกำหนดค่าการตั้งค่า
หัวข้อนี้ให้ตัวอย่างการใช้ Zapier ในการตั้งค่าเว็บฮุกที่จะส่งการแจ้งเตือนไปยังบัญชี Gmail เมื่อมีการเพิ่มระเบียนใหม่ใน Kintone
การตระเตรียม
ก่อนที่จะตั้งค่าเว็บฮุก ให้ทำการเตรียมการดังต่อไปนี้
- สร้าง บัญชี Gmail
- สร้าง แอป Kintone
เมื่อบัญชี Gmail และแอป Kintone ของคุณพร้อมแล้ว ให้ทำตามขั้นตอนที่อธิบายไว้ด้านล่าง
1) การตั้งค่าทริกเกอร์บน Zapier
-
เข้าถึงเว็บไซต์ Zapier และลงทะเบียน
หากคุณไม่มีบัญชี Zapier โปรดสร้างบัญชีใหม่หรือลงทะเบียนด้วยบัญชีประเภทอื่น (เช่น บัญชี Google) -
คลิก สร้าง Zap บนเว็บไซต์ Zapier
-
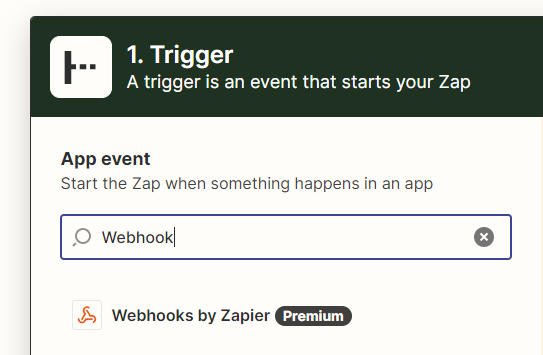
บนหน้าจอเพื่อเลือกทริกเกอร์ ให้ป้อน "Webhook" ในช่องค้นหาแล้วคลิก Webhook โดย Zapier
-
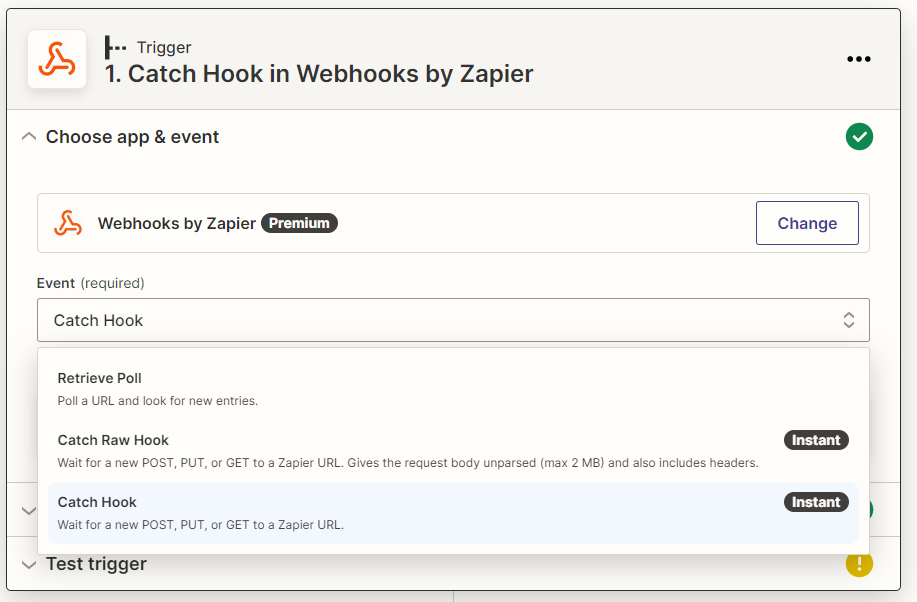
เลือก Catch Hook ภายใต้ Event แล้วคลิก ดำเนินการต่อ
-
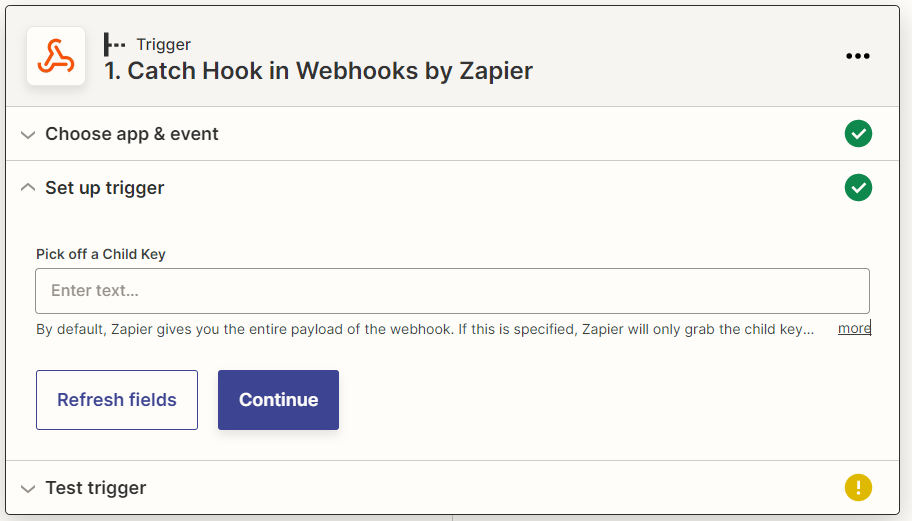
ในหน้าจอถัดไป คลิก ดำเนินการต่อ
-
เมื่อสร้าง URL เว็บฮุค ให้คลิก คัดลอก
วาง URL ที่คัดลอกไว้ที่ใดที่หนึ่งในมือ เช่น โปรแกรมแก้ไขข้อความ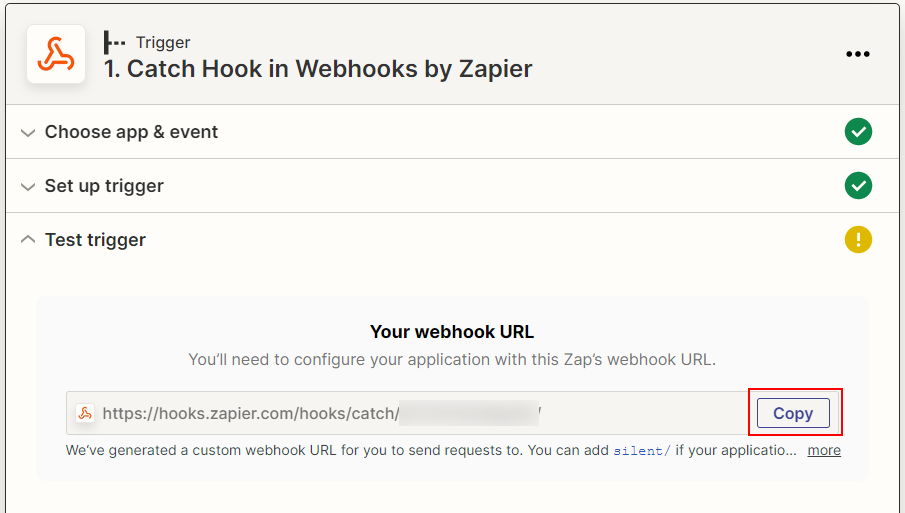
ต่อไปคุณจะตั้งค่าเว็บฮุกบน Kintone เปิดเว็บไซต์ Zapier ไว้
2) ตั้งค่าเว็บฮุกบน Kintone
-
คลิกไอคอน การตั้งค่าแอป (ไอคอนรูปเฟือง) ที่ด้านขวาบนของหน้าจอ ดู

-
บนหน้าจอ การตั้งค่าแอป ให้เลือกแท็บ การตั้งค่าแอป จากนั้นคลิก Webhook ภายใต้ การกำหนดเอง และการรวม
-
บนหน้าจอ Webhook ให้คลิก เพิ่ม webhook
-
บนหน้าจอ เว็บฮุกใหม่ ให้ป้อนคำอธิบายของเว็บฮุกที่จะตั้งค่า
คำอธิบายที่คุณป้อนที่นี่จะแสดงอยู่ในรายการของเว็บฮุก คุณสามารถป้อนได้สูงสุด 64 อักขระ -
ในช่องอินพุต จุดสิ้นสุดของ Webhook ให้วาง URL ที่คุณคัดลอกไว้ในขั้นตอนที่ 6 ของส่วน "การตั้งค่าทริกเกอร์บน Zapier"
ลบ "https://" ที่จุดเริ่มต้นของ URL
คุณสามารถกรอกตัวอักษรในช่องป้อนข้อมูลได้สูงสุด 1,024 ตัวอักษร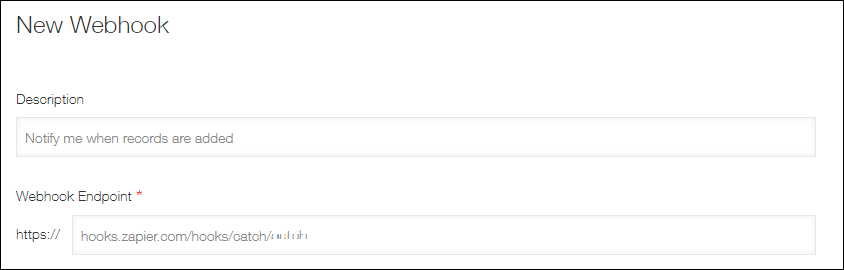
-
ในส่วน เหตุการณ์ ให้ระบุการดำเนินการที่จะทริกเกอร์การแจ้งเตือนเว็บฮุก
ในตัวอย่างนี้ ให้เลือก เพิ่มบันทึกแล้ว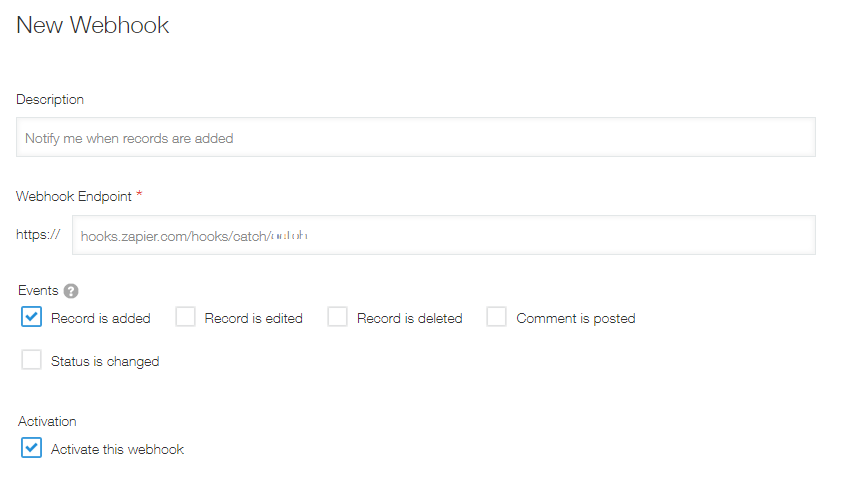
-
ตรวจสอบให้แน่ใจว่าได้เลือกช่องกาเครื่องหมาย เปิดใช้งาน Webhook นี้ แล้ว
ช่องกาเครื่องหมายจะถูกเลือกไว้ตามค่าเริ่มต้น -
คลิก บันทึก ที่ด้านขวาล่างของหน้าจอ
-
บนหน้าจอ Webhook ให้คลิก การตั้งค่าแอป ในข้อความที่แสดงที่ด้านบนของหน้าจอ หรือคลิก กลับไปที่การตั้งค่าแอป ที่แสดงที่ด้านซ้ายล่างของหน้าจอ
-
บนหน้าจอ การตั้งค่าแอป คลิก อัปเดตแอป
-
ในกล่องโต้ตอบ อัปเดตแอป คลิก อัปเดตแอป
-
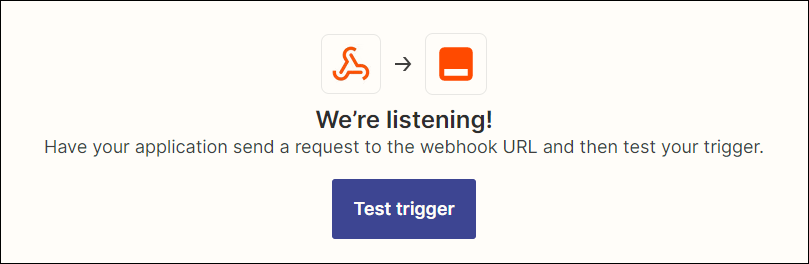
เพิ่มบันทึกใหม่ บนแอป Kintone เพื่อให้คุณสามารถทดสอบทริกเกอร์ที่คุณตั้งค่าไว้บน Zapier ได้
-
กลับไปที่เว็บไซต์ Zapier แล้วคลิก ทดสอบ ทริกเกอร์
-
ตรวจสอบว่าการทดสอบสําเร็จ จากนั้นคลิก ดำเนินการต่อ.
หากการทดสอบล้มเหลว ให้ลอง ทริกเกอร์ ทดสอบ หลายๆ ครั้ง
หากการทดสอบยังคงล้มเหลว ให้ตรวจสอบว่า URL ที่คุณคัดลอกและวางในช่องป้อนข้อมูล ปลายทาง Webhook ถูกต้อง
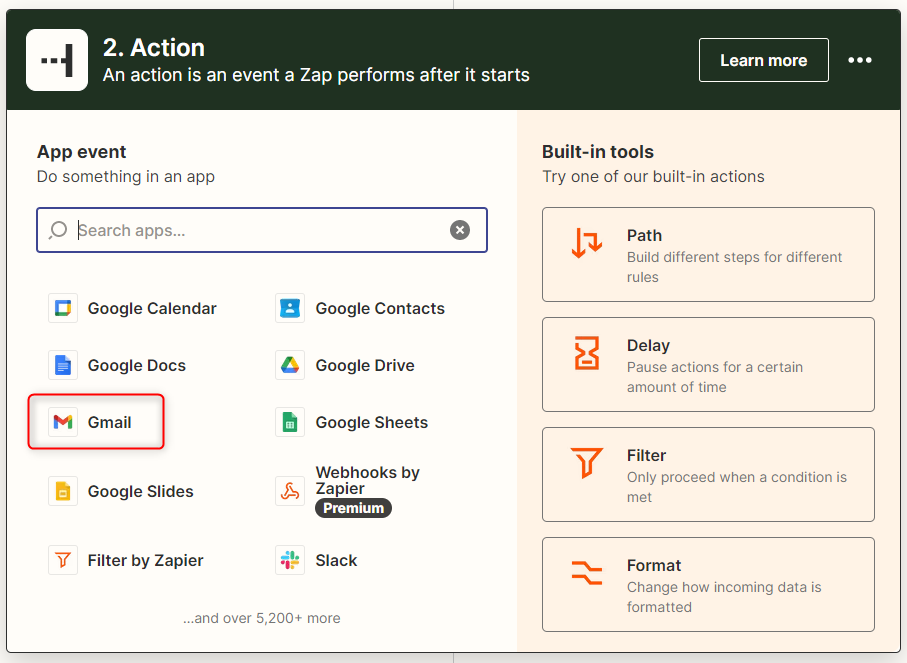
3) การตั้งค่าการดำเนินการบน Zapier
-
เมื่อปรากฏหน้าจอสำหรับตั้งค่าการดำเนินการใน Zapier ให้เลือก Gmail
-
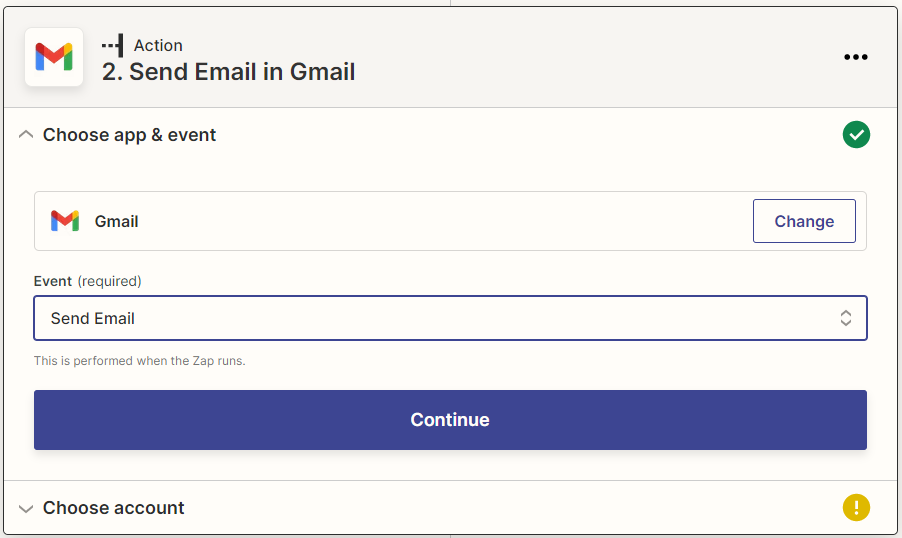
เลือก ส่ง อีเมล ภายใต้ เหตุการณ์ จากนั้นคลิก ดำเนินการต่อ
-
เลือก บัญชี Gmail แล้วคลิก ดำเนินการต่อ
หากคุณยังไม่ได้ลงชื่อเข้าใช้ Gmail หน้าจอจะปรากฏขึ้นเพื่อให้คุณลงชื่อเข้าใช้ Gmail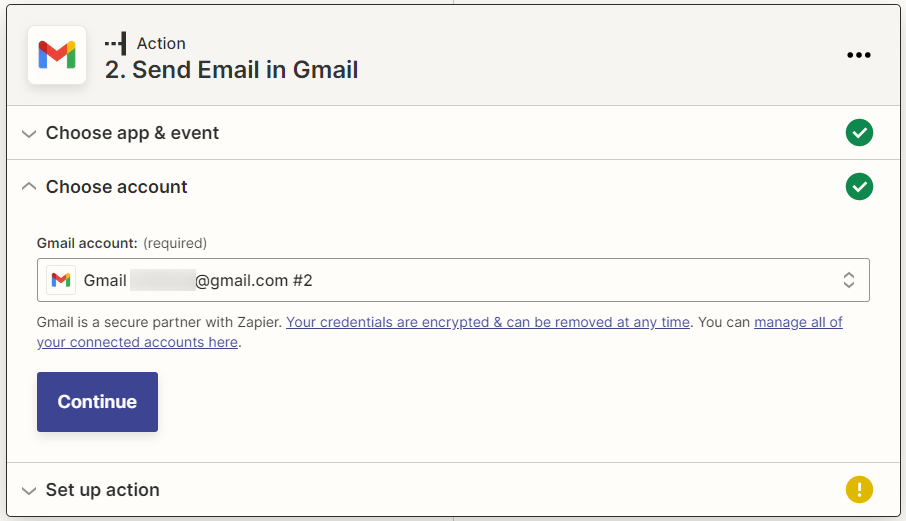
-
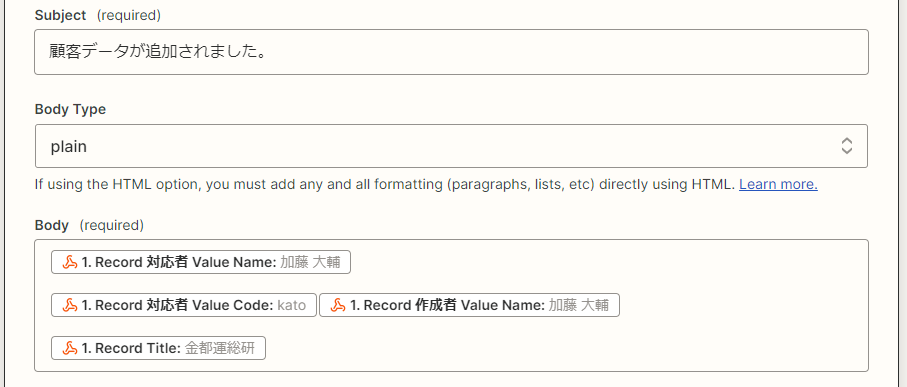
ระบุข้อมูลที่จะส่งไปยังบัญชี Gmail
กรอกบัญชี Gmail ของผู้รับลงในส่วน "ถึง" และตั้งค่ารายการอื่นๆ ที่จำเป็น รวมถึงส่วน หัวเรื่อง และ "เนื้อหา" จากนั้นคลิก "ดำเนินการต่อ"
-
ยืนยันการตั้งค่าที่คุณได้ตั้งค่าไว้และคลิก ทดสอบ และ ดำเนินการต่อ
-
คลิก เผยแพร่ Zap
-
ตรวจสอบว่าอีเมลการแจ้งเตือนถูกส่งไปยังบัญชี Gmail ของผู้รับแล้วคลิก เผยแพร่และเปิดใช้งาน
ตอนนี้ Zap มีผลบังคับใช้แล้ว
การเปลี่ยนแปลงการตั้งค่าของเว็บฮุกใน Kintone
คุณสามารถเปลี่ยนการตั้งค่า Webhook ใน Kintone ได้ในภายหลัง ขั้นตอนมีดังนี้
-
คลิกไอคอน การตั้งค่าแอป (ไอคอนรูปเฟือง) ที่ด้านขวาบนของหน้าจอ ดู
-
บนหน้าจอ การตั้งค่าแอป ให้เลือกแท็บ การตั้งค่าแอป จากนั้นคลิก Webhook ภายใต้ การกำหนดเอง และการรวม
-
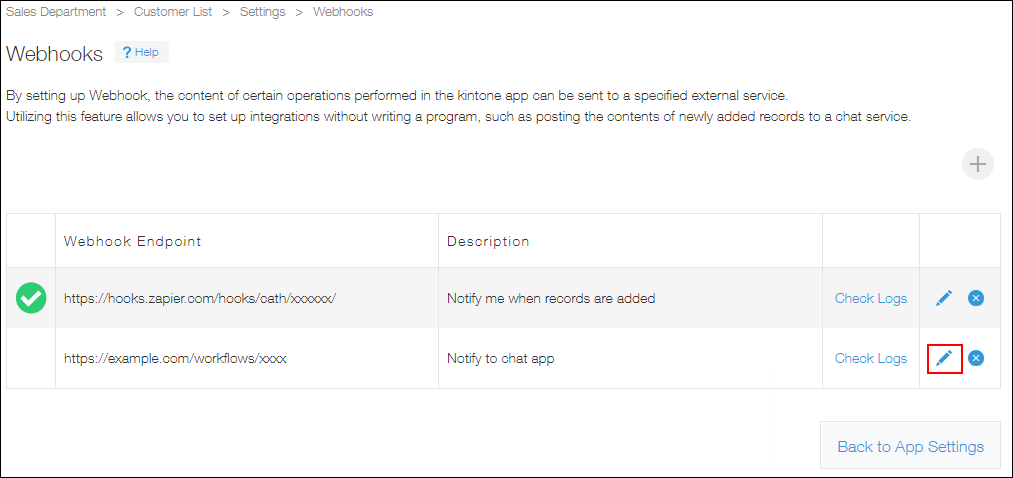
บนหน้าจอ Webhook ให้คลิกไอคอน แก้ไข ในคอลัมน์ด้านขวาสุดของเว็บฮุกที่คุณต้องการเปลี่ยนการตั้งค่า
-
บนหน้าจอ แก้ไข webhook ให้แก้ไขการตั้งค่าแล้วคลิก บันทึก
-
บนหน้าจอ Webhook ให้คลิก การตั้งค่าแอป ในข้อความที่แสดงที่ด้านบนของหน้าจอ หรือคลิก กลับไปที่การตั้งค่าแอป ที่แสดงที่ด้านซ้ายล่างของหน้าจอ
-
บนหน้าจอ การตั้งค่าแอป คลิก อัปเดตแอป
-
ในกล่องโต้ตอบ อัปเดตแอป คลิก อัปเดตแอป