การกำหนดค่าการอนุญาตสำหรับบันทึก
การกำหนด สิทธิ์ สำหรับการตั้งค่าระเบียน ช่วยให้คุณควบคุมได้ว่าผู้ใช้รายใดสามารถดู แก้ไข และลบระเบียนที่ระบุได้
ขั้นตอน
-
คลิกไอคอน การตั้งค่าแอป (ไอคอนรูปเฟือง) ที่ด้านขวาบนของหน้าจอ ดู
-
บนหน้าจอ การตั้งค่าแอป ให้เลือกแท็บ การตั้งค่าแอป จากนั้นคลิก บันทึก ภายใต้ สิทธิ์
-
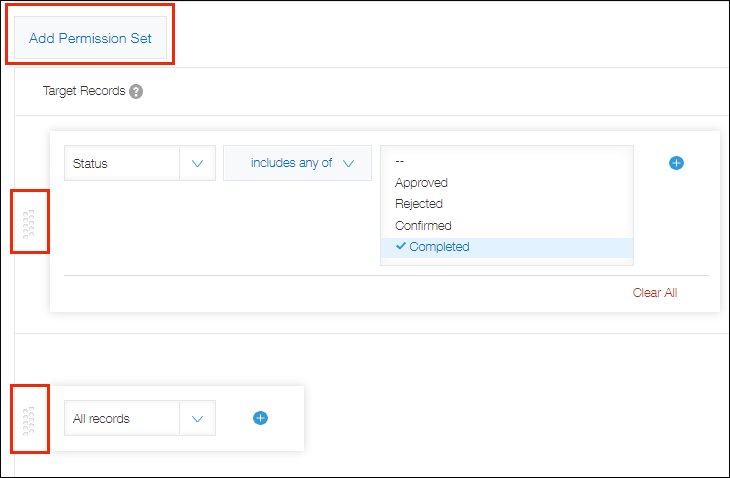
บนหน้าจอ สิทธิ์ สำหรับฟิลด์ ให้คลิก เพิ่มชุดการอนุญาต
-
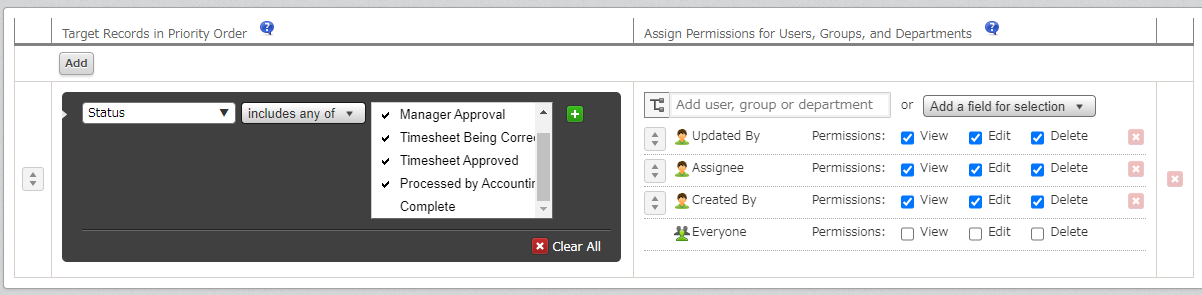
ในส่วนของ บันทึก เป้าหมาย ให้ระบุเงื่อนไขสำหรับการตั้งค่าสิทธิ์ที่จะนำไปใช้กับบันทึก
หากต้องการรวมเงื่อนไขหลายรายการ ให้คลิกไอคอน เพิ่มเงื่อนไข (ไอคอนรูปเครื่องหมายบวก) จากนั้น ระบุเงื่อนไขเพิ่มเติม และเลือก "ตรงตามเงื่อนไขทั้งหมด หรือ ตรงตามเงื่อนไขต่าง ๆ"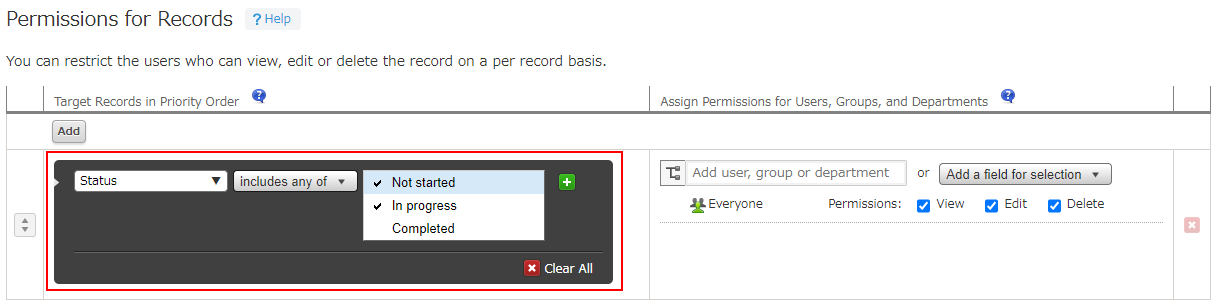
-
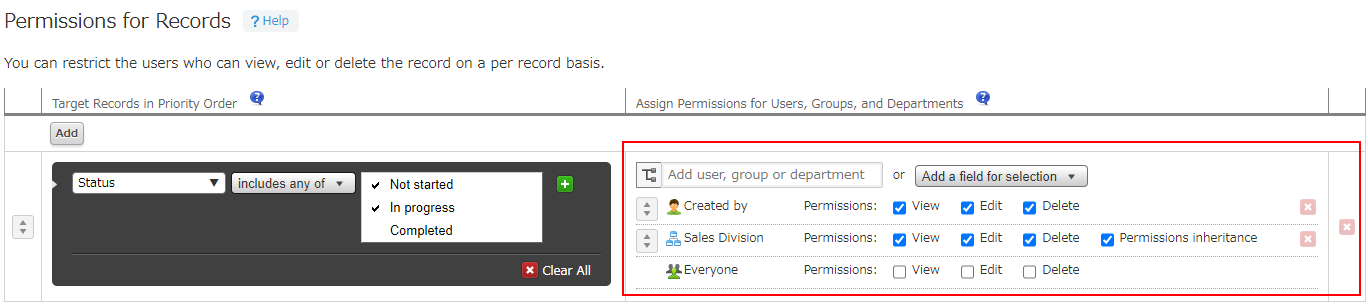
ในส่วน ผู้ใช้งาน กลุ่ม และแผนกที่จะให้สิทธิ์ ให้เพิ่มผู้ใช้ กลุ่ม หรือแผนกที่คุณต้องการตั้งค่าสิทธิ์
คุณสามารถเพิ่มผู้ใช้ กลุ่ม หรือแผนกได้โดยใช้กล่องค้นหา หรือคลิกไอคอน เลือกผู้ใช้งานจากแผนกหรือกลุ่ม ทางด้านขวาของกล่องค้นหา แล้วเลือกจากกล่องโต้ตอบ เลือก ผู้ใช้
-
หากคุณต้องการให้สิทธิ์แก่ผู้ใช้ แผนก หรือกลุ่มที่ป้อนในฟิลด์บางฟิลด์ ให้คลิก เพิ่มฟิลด์สำหรับการเลือก และเลือกฟิลด์
สามารถเลือกฟิลด์ได้ดังต่อไปนี้- ตัวเลือกผู้ใช้งาน
- การเลือกแผนก
- การเลือกกลุ่ม
- สร้างแล้ว โดย
- อัปเดตแล้ว โดย
หากเปิดใช้งานคุณลักษณะ การจัดการกระบวนการ ก็สามารถเลือก ผู้รับมอบหมาย ได้เช่นกัน
-
เลือก ช่องกาเครื่องหมายสำหรับสิทธิ์ที่คุณต้องการมอบให้กับผู้ใช้ แผนก หรือกลุ่ม
-
หากต้องการตั้งค่าการรวมกันของระเบียนเป้าหมายและสิทธิ์อนุญาตหลายรายการ ให้คลิก เพิ่มชุดสิทธิ์อนุญาต อีกครั้ง และเพิ่มเงื่อนไขเพิ่มเติม
เมื่อมีชุดสิทธิ์หลายแถว แถวที่สูงกว่าจะมีสิทธิ์เหนือกว่าแถวที่ต่ำกว่า หากต้องการเปลี่ยนลำดับความสำคัญของแถว ให้ลากและวางแถวโดยใช้ไอคอน "แก้ไขลำดับ ทางด้านซ้าย
-
คลิก บันทึก ที่ด้านขวาล่างของหน้าจอ
-
บนหน้าจอ การตั้งค่าแอป คลิก อัปเดตแอป
-
ในกล่องโต้ตอบ อัปเดตแอป คลิก อัปเดตแอป
ฟิลด์ ที่ไม่สามารถระบุได้ในส่วน "บันทึก เป้าหมาย"
ไม่สามารถระบุฟิลด์ต่อไปนี้ได้ในส่วน บันทึก เป้าหมาย
- ป้ายกำกับ
- Rich Text
- กล่องข้อความ
- ไฟล์แนบ
- เร็คคอร์ดที่เกี่ยวข้อง
- พื้นที่ว่าง
- เส้นแบ่งขอบ
หากคุณต้องการมอบสิทธิ์การเข้าถึงโดยใช้แผนกหรือกลุ่ม
หากคุณตั้งค่าการอนุญาตโดยใช้แผนกหรือกลุ่ม และการตั้งค่าของแผนกหรือกลุ่มมีการเปลี่ยนแปลง การเปลี่ยนแปลงดังกล่าวอาจไม่ปรากฏในการตั้งค่าการอนุญาต
หากต้องการให้ข้อมูลแผนกและกลุ่มล่าสุดแสดงอยู่ในการตั้งค่าการอนุญาตบันทึกทั้งหมด โปรดอัปเดตการตั้งค่าแอป
โปรดทราบว่าการตั้งค่าการอนุญาตการบันทึกจะสะท้อนเมื่อดำเนินการต่อไปนี้
- เมื่อการตั้งค่าแอปได้รับการอัปเดต
- เมื่อมีการเพิ่มบันทึก
- เมื่อมีการอัพเดตบันทึก
หากคุณรวมผู้ใช้รายเดียวไว้ในชุดสิทธิ์หลายชุด
หากผู้ใช้รายเดียวถูกเพิ่มเข้าไปในชุดการอนุญาตหลายชุดในการตั้งค่า สิทธิ์ สำหรับระเบียน ชุดการอนุญาตที่อยู่อันดับสูงสุดในรายการจะมีสิทธิ์เหนือกว่า
ตัวอย่างเช่น สมมติว่าแผนก "ฝ่าย ขาย" อยู่เหนือ "ทุกคน" หากแผนก "ฝ่าย ขาย" มีสิทธิ์ "ดู" แต่ "ทุกคน" ไม่มี เฉพาะผู้ใช้ที่อยู่ในแผนก "ฝ่าย ขาย" เท่านั้นที่จะสามารถดูบันทึกที่เกี่ยวข้องได้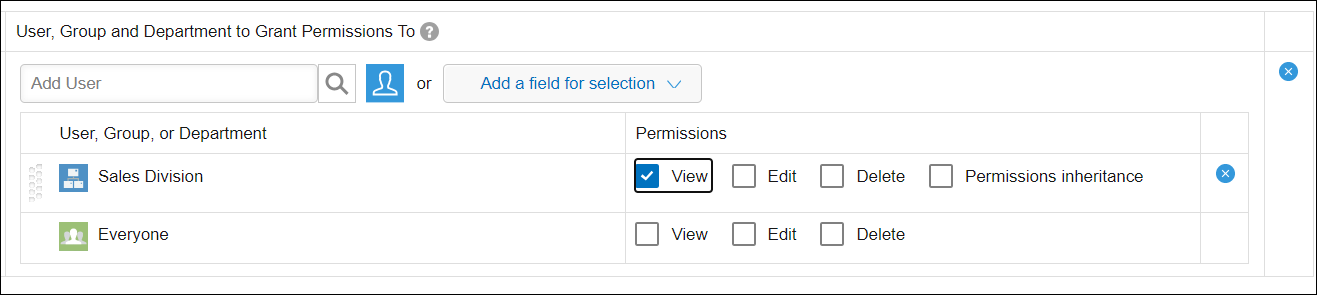
ตัวอย่างการใช้สิทธิ์อนุญาตบันทึก
หัวข้อนี้แสดงตัวอย่างการใช้งานการตั้ง สิทธิ์ สำหรับบันทึก
ระบุ "สร้างแล้ว โดย", "อัปเดตแล้ว โดย" หรือ "ผู้รับมอบหมาย"
คุณสามารถตั้งค่าสิทธิ์สําหรับผู้ใช้ที่สร้างเรกคอร์ด ผู้ใช้ที่อัปเดตเรกคอร์ด หรือผู้รับมอบหมายการจัดการกระบวนการ
ตัวอย่างเช่น ในแอปที่เปิดใช้งานคุณลักษณะ การจัดการกระบวนการ คุณสามารถกําหนดการตั้งค่าในลักษณะที่เฉพาะ สร้างแล้ว โดย ผู้รับมอบหมาย และ อัปเดตแล้ว โดยผู้ใช้สามารถ ดูเรกคอร์ดที่มีสถานะที่ไม่ได้ตั้งค่าเป็น "เสร็จสิ้น"
การระบุฟิลด์ "ตัวเลือกผู้ใช้งาน" หรือ "การเลือกแผนก"
ด้วยการระบุเขตข้อมูล ตัวเลือกผู้ใช้งาน หรือ การเลือกแผนก ที่วางไว้บนฟอร์มแอป คุณสามารถใช้การตั้งค่าสิทธิ์กับผู้ใช้หรือแผนกที่เลือกสําหรับเขตข้อมูลในแต่ละเรกคอร์ดแทนที่จะใช้กับผู้ใช้หรือแผนกใดรายหนึ่ง
ตัวอย่างเช่น คุณสามารถกําหนดการตั้งค่าในลักษณะที่เฉพาะผู้ใช้ที่ระบุในฟิลด์ ตัวเลือกผู้ใช้งาน เฉพาะ (ฟิลด์ "รับผิดชอบ") เท่านั้นที่สามารถแก้ไขหรือลบเรกคอร์ดได้